How does a 25% boost in monthly revenue sound?
That’s how much email marketing contributes to our six-figure per year business, ClickMinded.
You may be thinking “oh, marketing emails are just annoying – I usually send them to the spam folder.”
And, that’s because most email marketers suck people just don’t get email marketing right.We had no doubts about email marketing – after all, we’ve had only good experiences.
Once, ClickMinded generated $21,243 in revenue in 8 days by leveraging AppSumo’s amazing email marketing engine.
And I want that type of success for you.
Does that mean that you’ll have to write an email newsletter every week?

Not at all. It’s actually been months since we wrote a single new marketing email.
This guide will show you EXACTLY how to set up a process that will capture emails, segment subscribers, and nurture them with email marketing while you [freak out about Trump / freak out about Game of Thrones / do hot yoga / use Snapchat to face-swap with everyone and everything.]
A simple automation setup like the one I’ll show you in this guide takes under an hour to create from scratch, and I can guarantee that few things will provide a higher ROI for your time.
If you’re anything like me, and you work on your business on nights and weekends, finding a way to automate acquisition will be a game-changer.
Here’s how you can achieve massive results with your email marketing.
Step #1: Find Your Most Valuable Piece Of Content (Total Time: Under 1 Minute)
Think of capturing emails as an exchange of value: visitors are willing to share their contact information with you because they know you’ll send some valuable content their way.
Let’s face it; no one willingly signs up to receive emails about a bounty for rescuing a Nigerian astronaut prince.
You need to figure out which is your most valuable piece of content so you can use it to convince your visitors to leave their emails. This works way better than the generic “sign up for our newsletter” message.
A simple way to do this is by going to your Google Analytics reporting tab and checking the content page that receives the most visits – other than your homepage, obviously.
Sign in to Analytics and click Behavior > Site Content > All Pages. Here are our results:
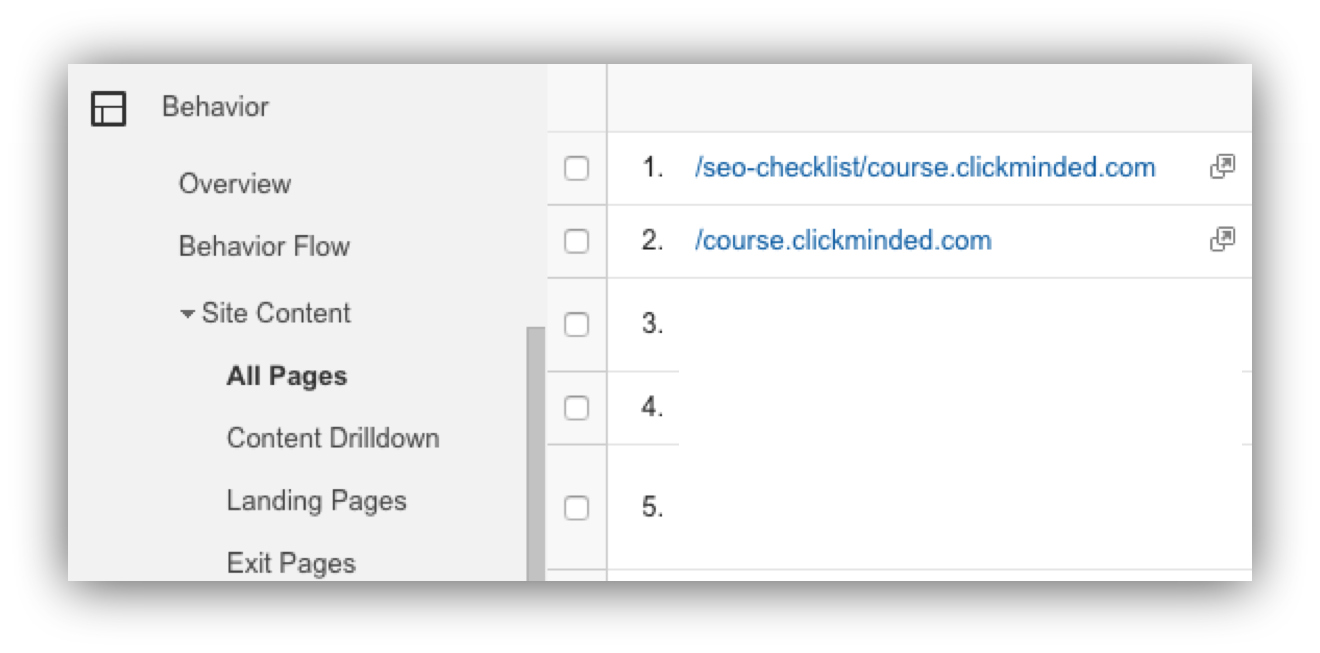
As you can see, the “SEO Checklist” is very popular among our website visitors and will be a good piece of content to offer to our visitors.
If you don’t have any wildly popular posts yet, don’t worry! Read this walkthrough on how to write popular content.
Step #2. Capturing The Emails (Total Time: 3 Minutes)
Now that you’ve got something that will have your visitors begging to give you their email addresses, it’s time to give them the opportunity to do so. We’ve tried all of Sumo’s tools, but our absolute favorite would have to be Welcome Mat – check out these conversion rates (and avoid salivating too much. I just cleaned the floor.)
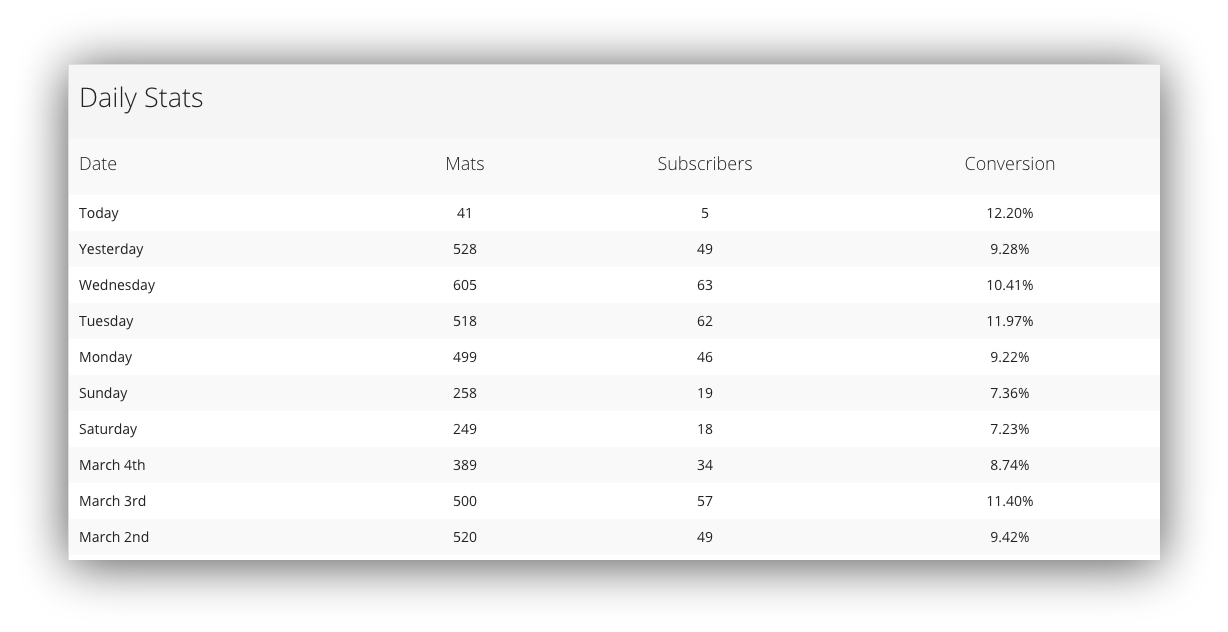
That’s right. We’re getting up to 11.5X the average conversion rate across all of Sumo’s users.
Welcome Mat allowed us to keep in touch with our website visitors via email, instead of just hoping they would come back some day.
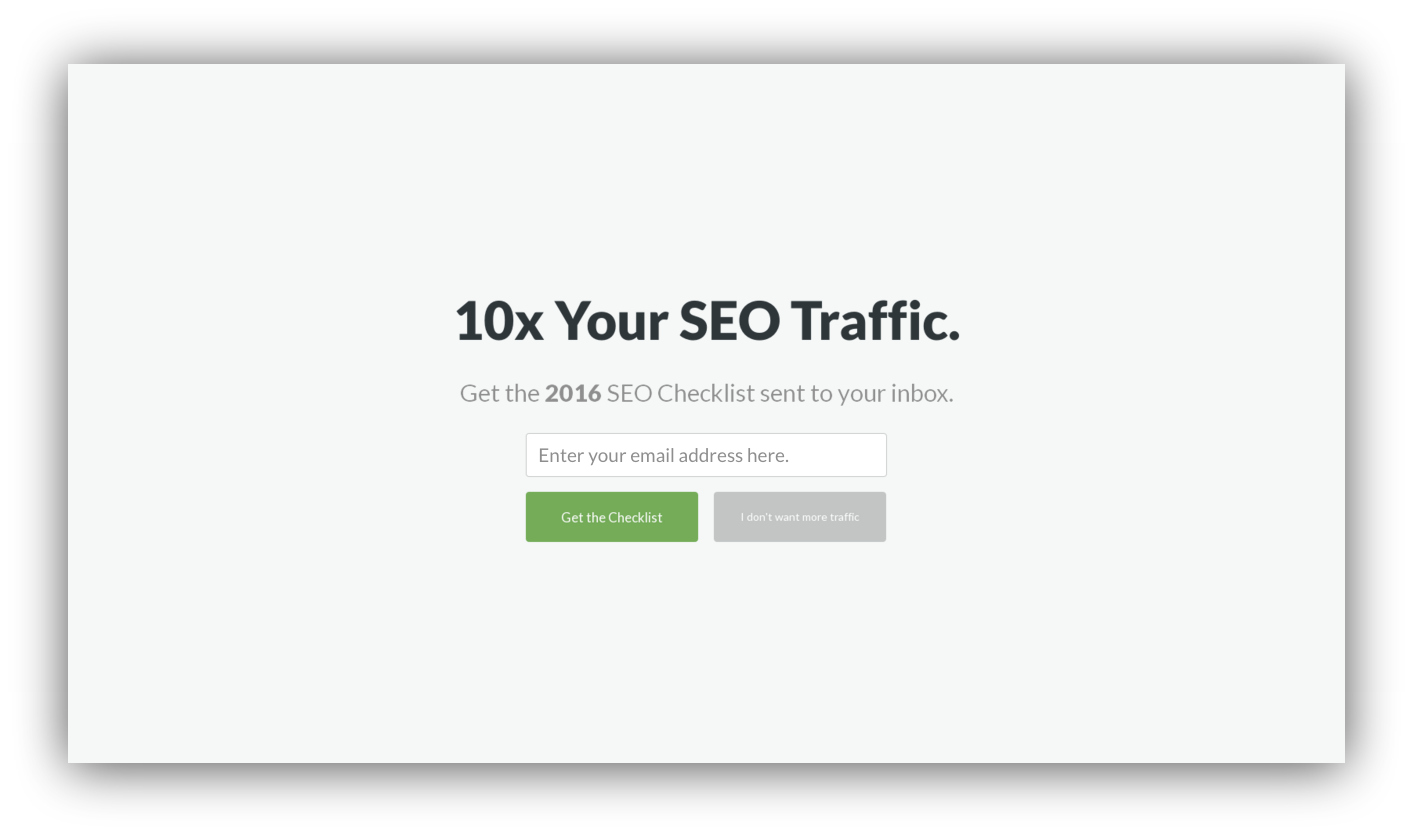
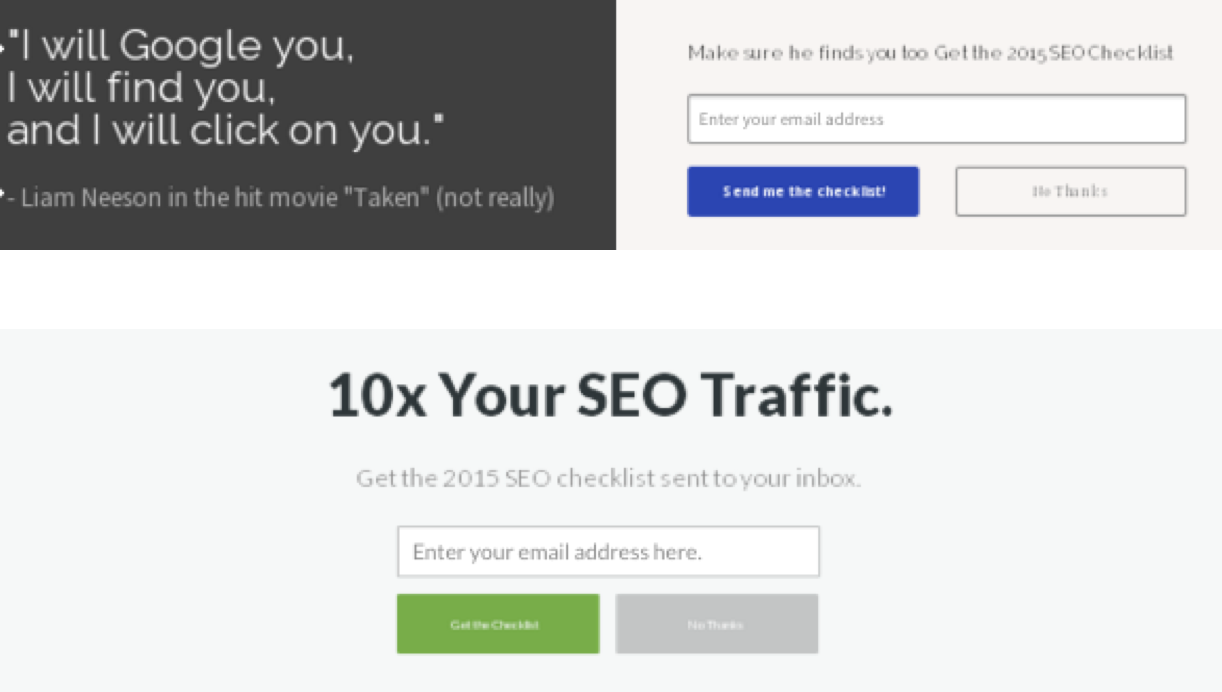
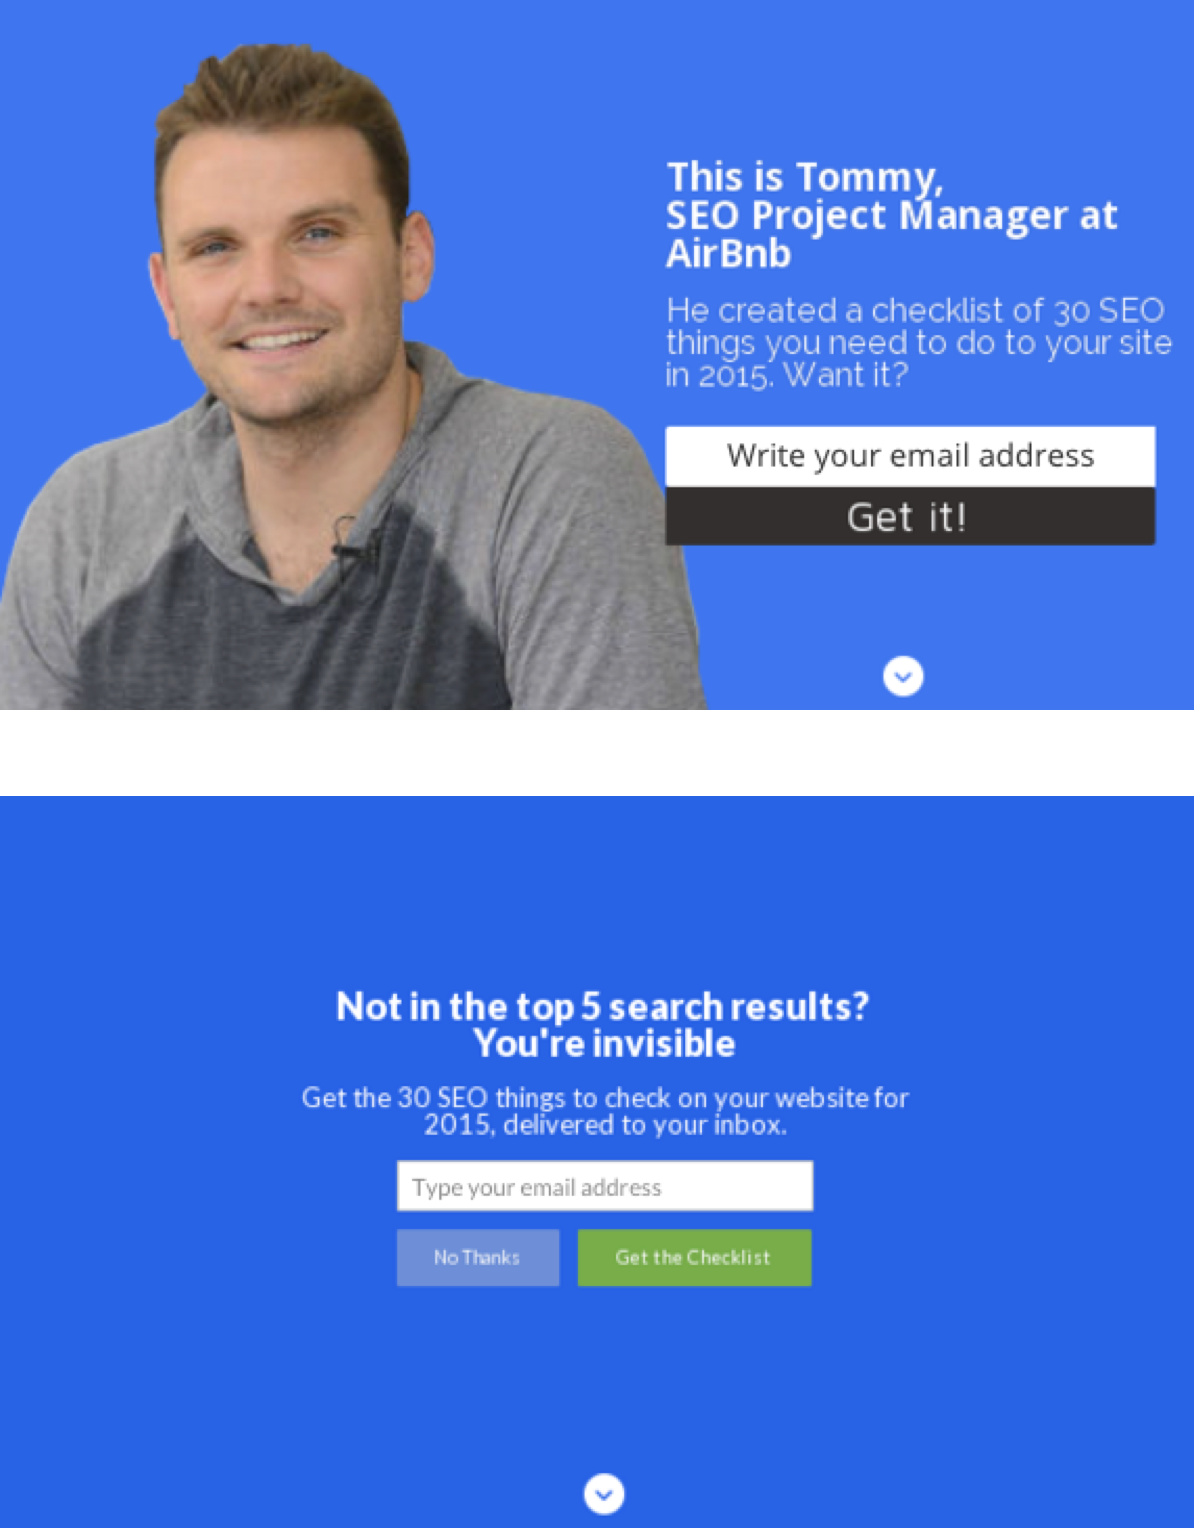
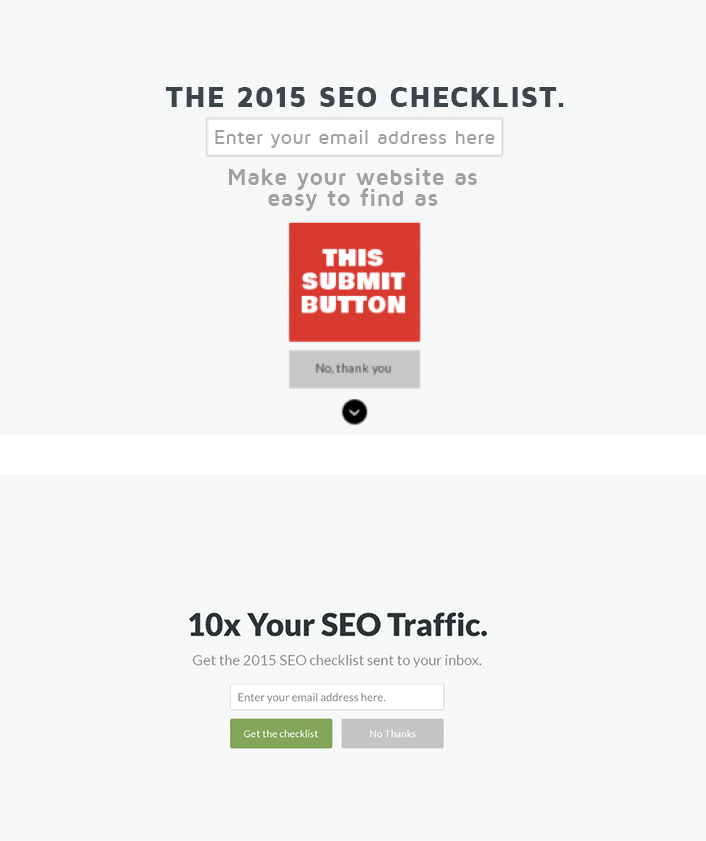
Now, set up your own Welcome Mat and throw a compelling value proposition up for the content you’re promoting. How will this piece of content change your visitors’ lives?
For example, if you have a blog for amateur runners and your most popular content is “how to train for your first marathon,” your value proposition could be “finish your first marathon in under 4 hours.”
This is the Welcome Mat we currently use to get subscribers by promoting our most valuable piece of content:
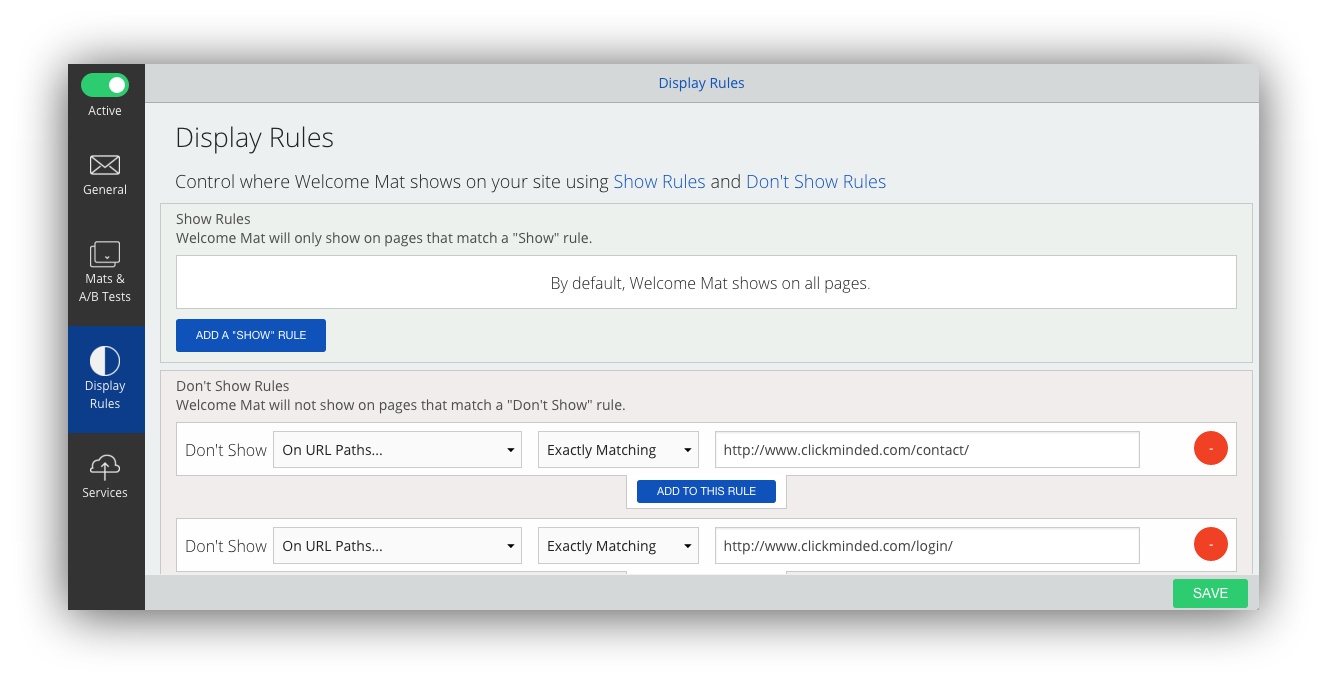
ProTip: Exclude your checkout and other transactional pages from displaying any email collection tool – your visitor is already taking action on something. You don’t want to distract them from that. To do that just go to “Display Rules” under your active campaign and add “Don’t Show Rules.”
Now, let your email list grow and move on to step #3.
Step #3. Pay Attention To Your High-Value Visitors (Total Time: 5 Minutes)
The previous step allows you to establish a line of communication with most visitors to your site.
However, there is one smaller – yet potentially more valuable – group of people that you may want to pay close attention to.
- People who were very close to purchasing. For example, those who placed your product on their shopping carts but left right before checking out.
- Visitors who you know have a higher chance of converting. If you run a photography tips website and make money by selling classes, those visitors checking out your blog post about the “top 5 photography courses” are more likely to purchase.
These are called “segments,” which is just a fancy term for “groups of people that have something in common.” In the examples above, what they have in common is that they are very interested in what you offer (Cha-Ching!)
Remember this term, since it will be very important for our process starting from now.
A lot of businesses address these high-value segments with remarketing – remember checking out a pair of shoes on Amazon, and then being followed across the internet by the same pair of shoes? That’s remarketing.

However, remarketing can be hard to set up if you’re just getting started. Plus, you can achieve a level of success in the follow-up that is orders of magnitude higher if you know exactly who your visitors are and have their email address.
In the case of ClickMinded, we allow visitors to view a free demo of the course. This is a great opportunity to build a segment, because people who’ve already seen the demo are a lot closer to purchasing than those who haven’t.
So how did we build our high-value segment?
We used to just let people see the demo and hope that a percentage of them would check out. Until we figured out that we could also use Welcome Mat to get users to sign up before viewing the demo. This way, we could follow up with those visitors who were closer to purchase but dropped off.
How can you build a high-value segment?
- Offer an 10% off coupon before checkout in exchange for an email address.
- Present your second most valuable piece of content (re-do steps #1 and #2) and offer it in pages that are closely related to what you’re selling.
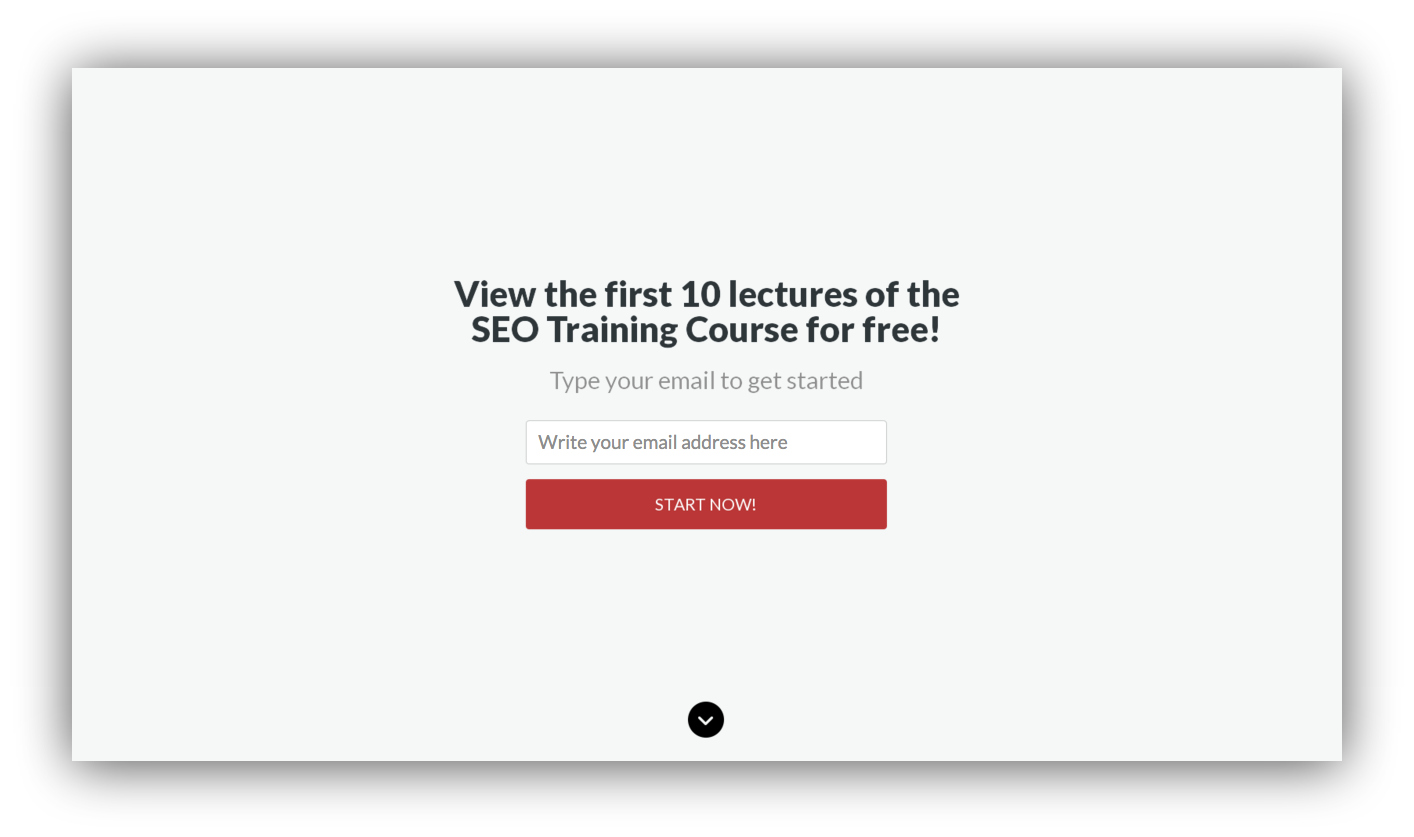
- Create a signup wall for free premium content – what we did at ClickMinded.
Again, you should include a powerful call to action in your Welcome Mat and emails just watch come in. This is our signup wall:
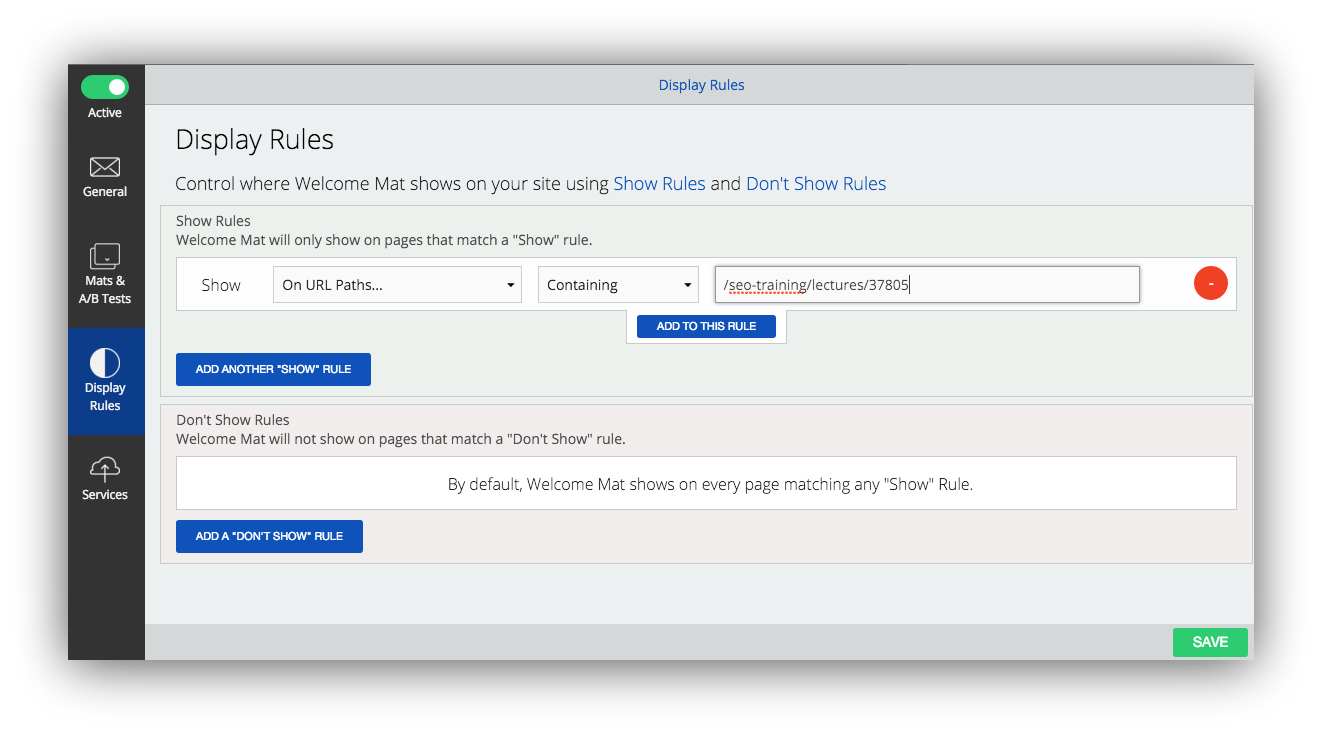
In this case, we wanted to collect emails only at a very specific location of our site, so we defined a “Show Rule” for this Welcome Mat to be displayed only in the URL of the first lecture of the demo.
NOTE: to set this up with two Welcome Mats working simultaneously, we used a second Sumo install in the subdomain where the demo course resides (course.clickminded.com), which is different from our top-level domain (clickminded.com)
Confused about subdomains? Don’t you worry.
NOTE 2: You don’t need a subdomain to do this. The same scheme can just as easily be achieved with List Builder and Welcome Mat under the same installation – all you’ll need to do is disable “Yield Tech” under “Behavior” in your List Builder popup.

Let’s sum up what you’ve accomplished so far:
- You found your most valuable piece of content.
- You’re using this content to grow your email list.
- You’ve identified a high-value segment and collected their emails too.
Now give yourself a well-deserved high five.

And let’s move on to the money maker: the emails.
Step #4. Creating Email Sequences (Total Time: 40 Minutes)
So naturally, you’ve got to actually deliver the content you promised visitors in exchange for their emails.
So set up an email that will be sent automatically and immediately after they hit the submit button.
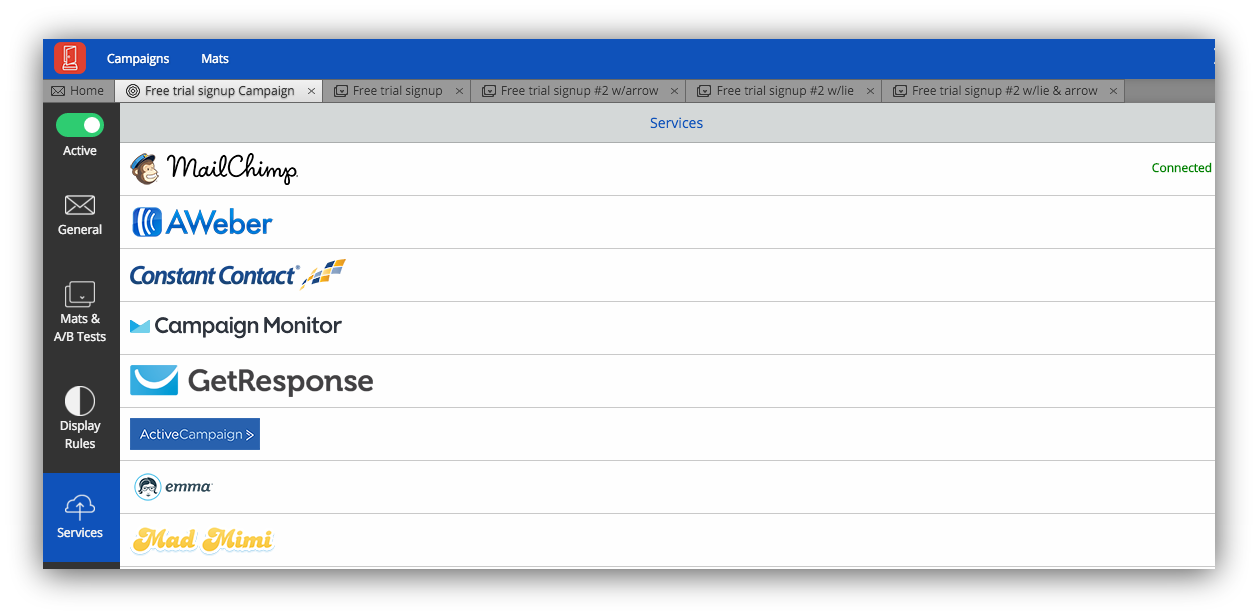
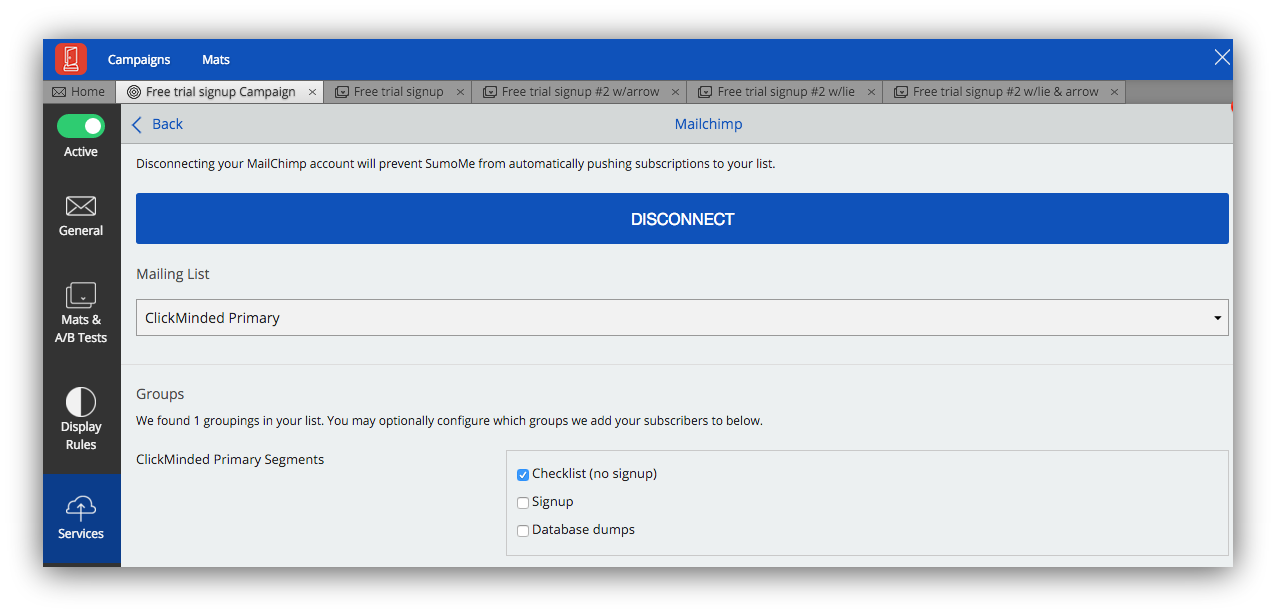
We use MailChimp for email marketing, which includes a very useful automation feature and integrates directly with Sumo: Just go to your Welcome Mat or List Builder campaigns, click on “Services” and select MailChimp.
NOTE: Almost every paid email service provider offers a similar automation option.
Once you input your MailChimp login information, you will be able to push subscribers to a specific list.
Based on what we described in steps 2 and 3, we have two segments that correspond to two lists:
- General visitors who subscribe through the main Welcome Mat get added to a “primary list.”
- Our high-value segment. Subscribers who drop off close to purchase get added to a “drop-off list.”
Now, we need to trigger an email sequence when a new subscriber gets added to our “primary list” and set our first email in the sequence to go out immediately after the trigger to deliver the promised content.
Here’s how to set that up on MailChimp:
First, click on “Automation” in the top nav of your MailChimp account and select “Create Automation Workflow” (this is how email sequences are called in Mailchimp,)

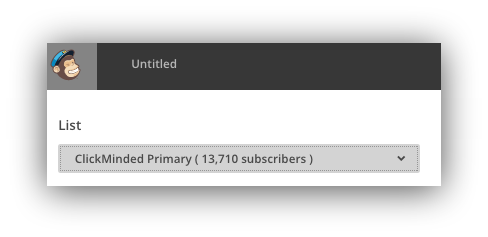
Then, select the list for which you want to create an automation workflow.
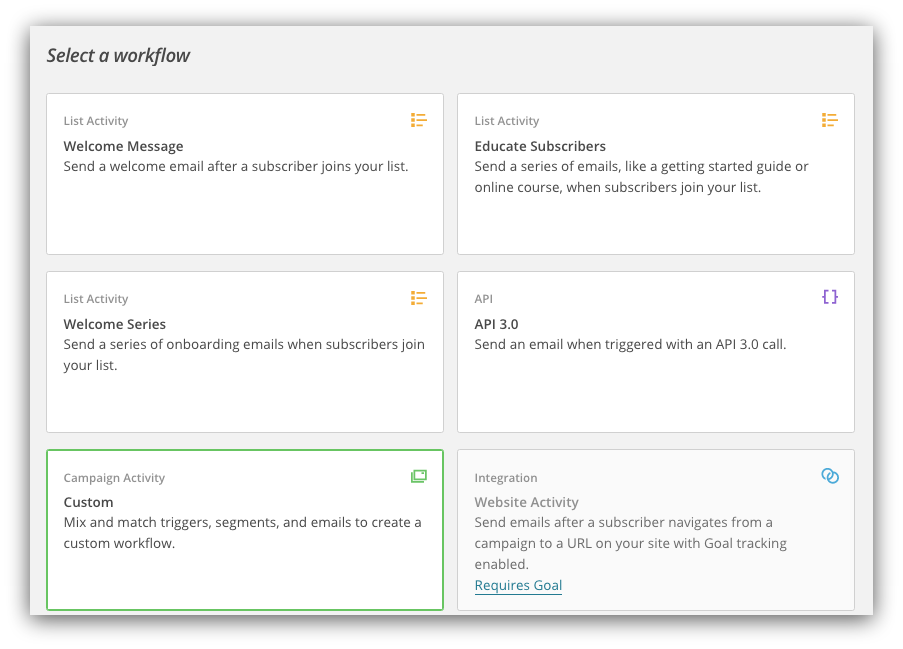
Now pick the type of workflow that you want to create. We like to go with “Custom” to get a blank slate for our automation process:
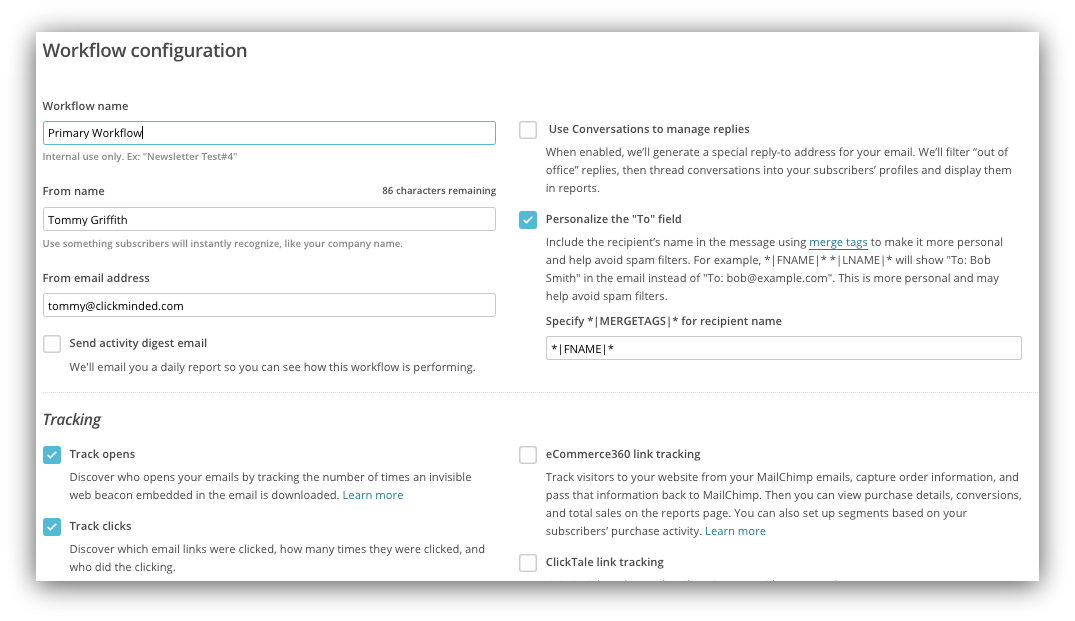
Give your workflow a name, set up the “from” name and email, and remember to check the boxes to track opens and clicks!
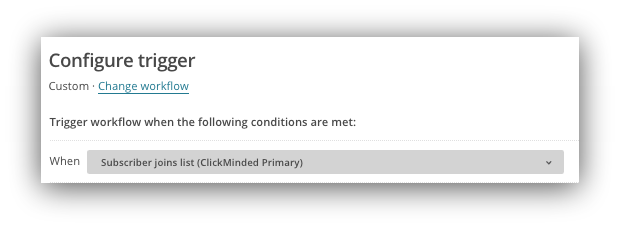
Time to configure the trigger – this is what will signal MailChimp to include the subscriber into the automated workflow. Go with “Subscriber joins list” from the drop-down menu.
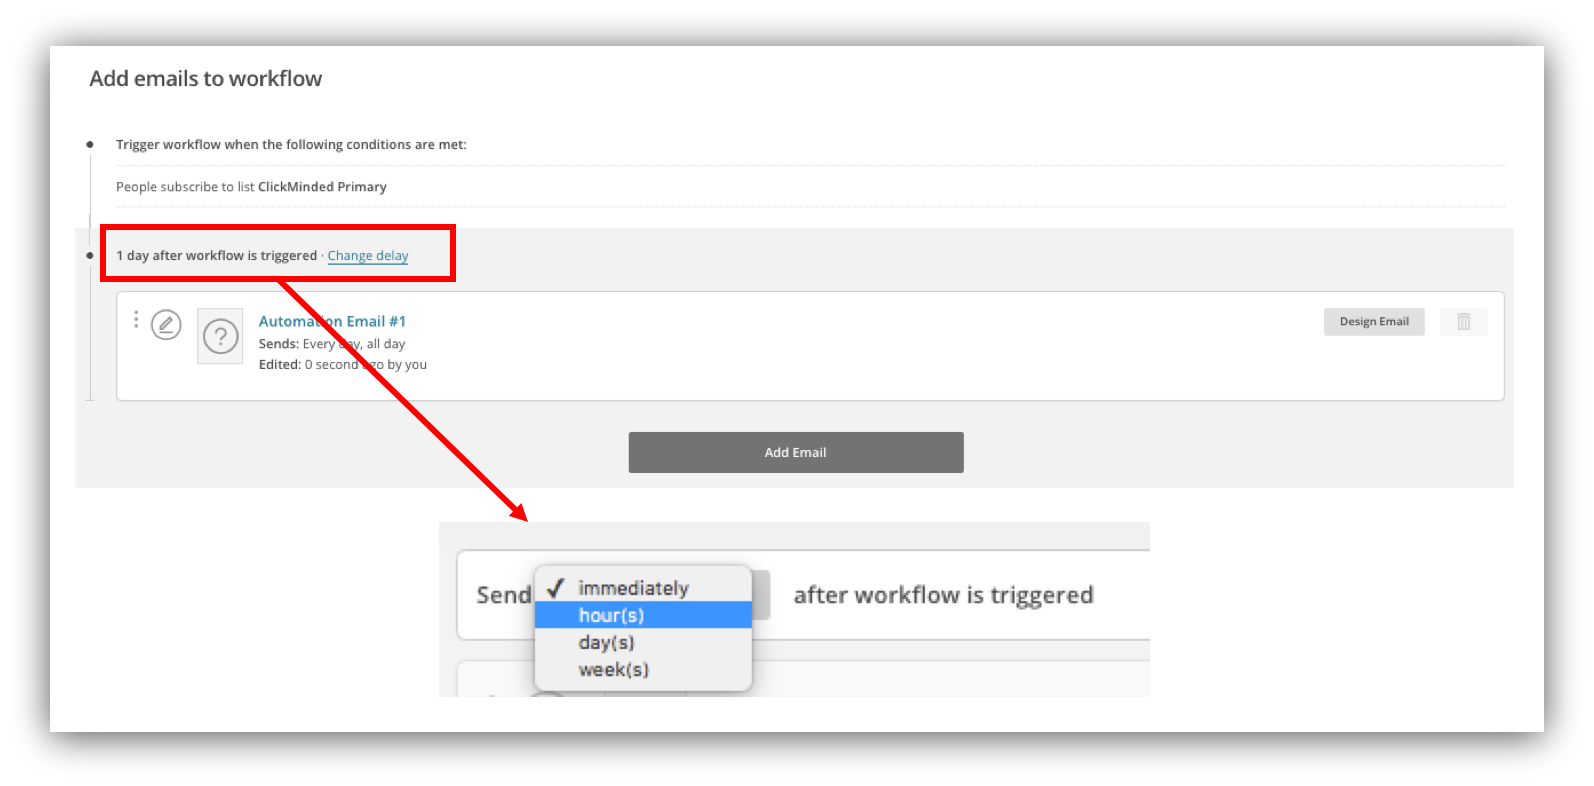
Click next, and you will be prompted to adding your first email. Upon doing this, the default delay for the first email is 1 day – be sure to change that to “Immediately” since you don’t want the subscriber to wait to receive this first piece of content.
Now’s the time to be charming! Imagine this is Tinder: your visitors already swiped right on you by subscribing and now you have to use sweet talk and keep them interested.
Click on “Design email,” write an attractive subject mentioning the name of the content, and include a link to it in the body of the email.
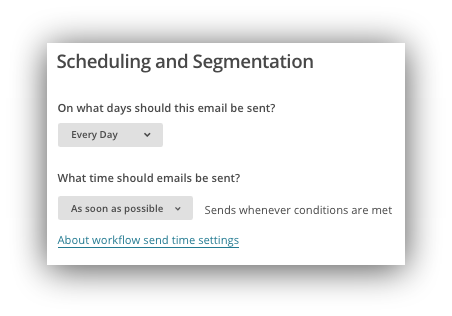
The final step of designing the email will be to configure scheduling (we will talk about segmentation later in this guide, so don’t worry about it just yet.) Make sure that your email gets sent every day at every time.
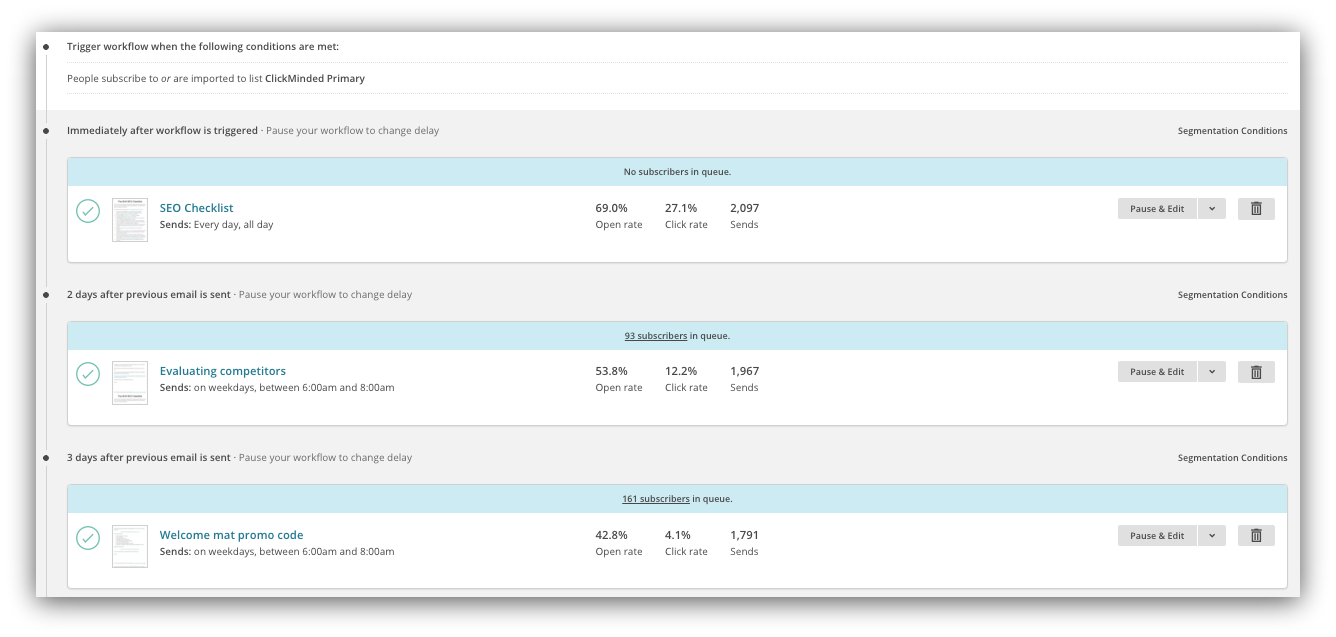
After all of that, you should end up with something that looks very similar to this:
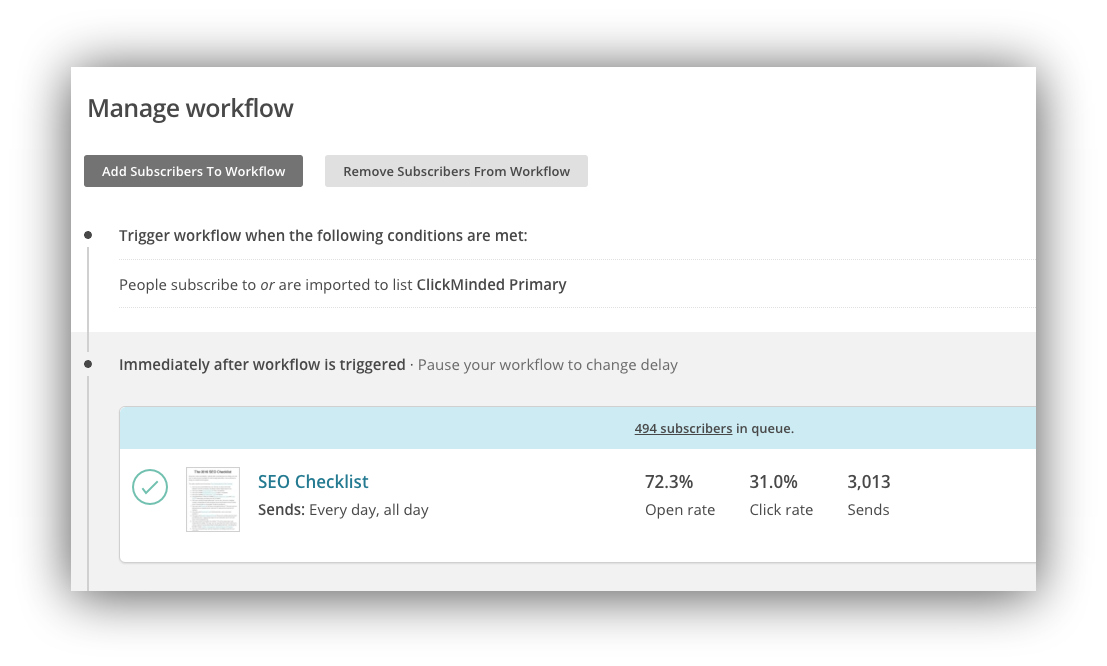
(Notice to avoid salivation #2) Did you see the open and click rates on this email? That’s what you get when people actually request to be emailed by you.
Now that you’ve delivered on your promise and set high expectations for the emails that your subscribers will receive from you, it’s time to think about nurturing these relationships. You should keep delivering useful content that will make them want to go back to your site and potentially purchase.
You know the drill already.
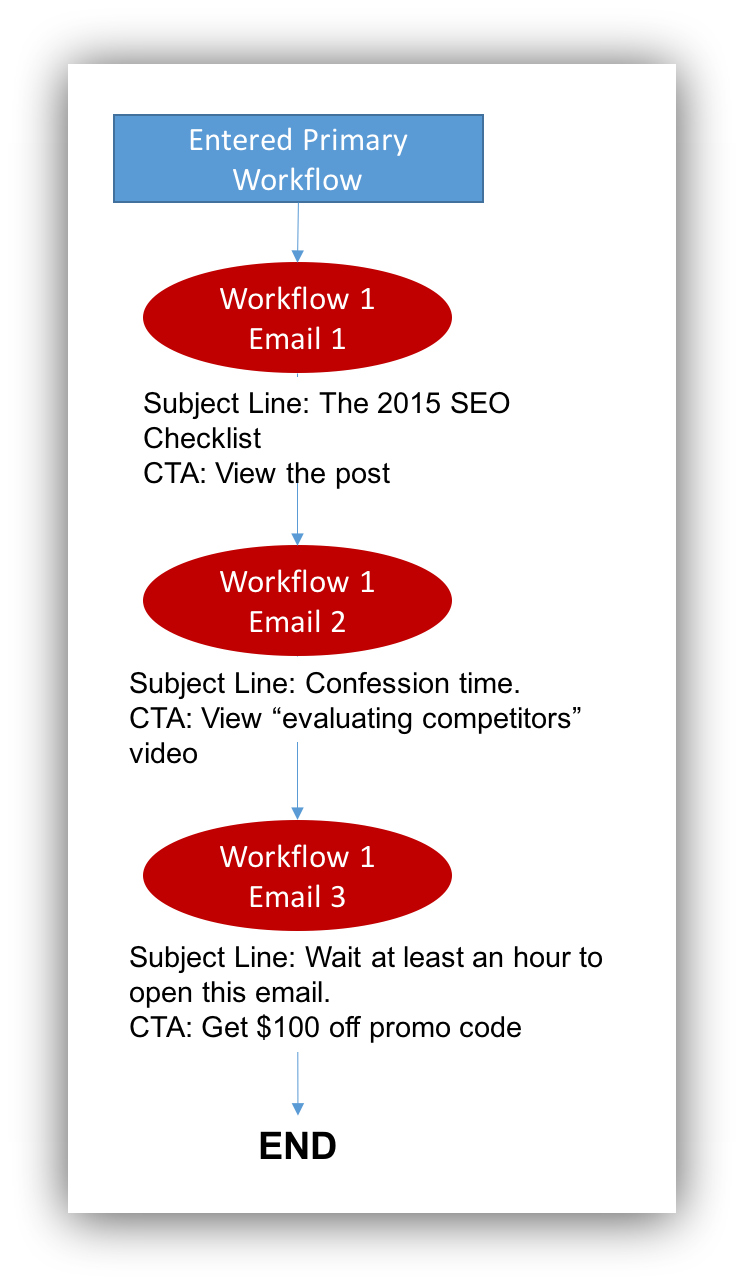
Find or create content your audience will like and send it over as a part of your sequence with certain delays between emails (we chose 2 days of delay for the second email and 3 days for the third and final one.) This is our “primary workflow.”
You may have noticed that we added a promo code for the purchase of the course at the end of our sequence. We only offered this discount towards the end for several reasons:
- We didn’t want to seem like we were trying to sell from the start. This would defeat the whole purpose of delivering value towards nurturing the relationship.
- The subscriber could potentially purchase at full price, so giving them the option to discount up front would hurt our revenue.
- The promo code was the last resource to convert someone who was still undecided after several contacts with us.
This is how our email automation looked like so far:
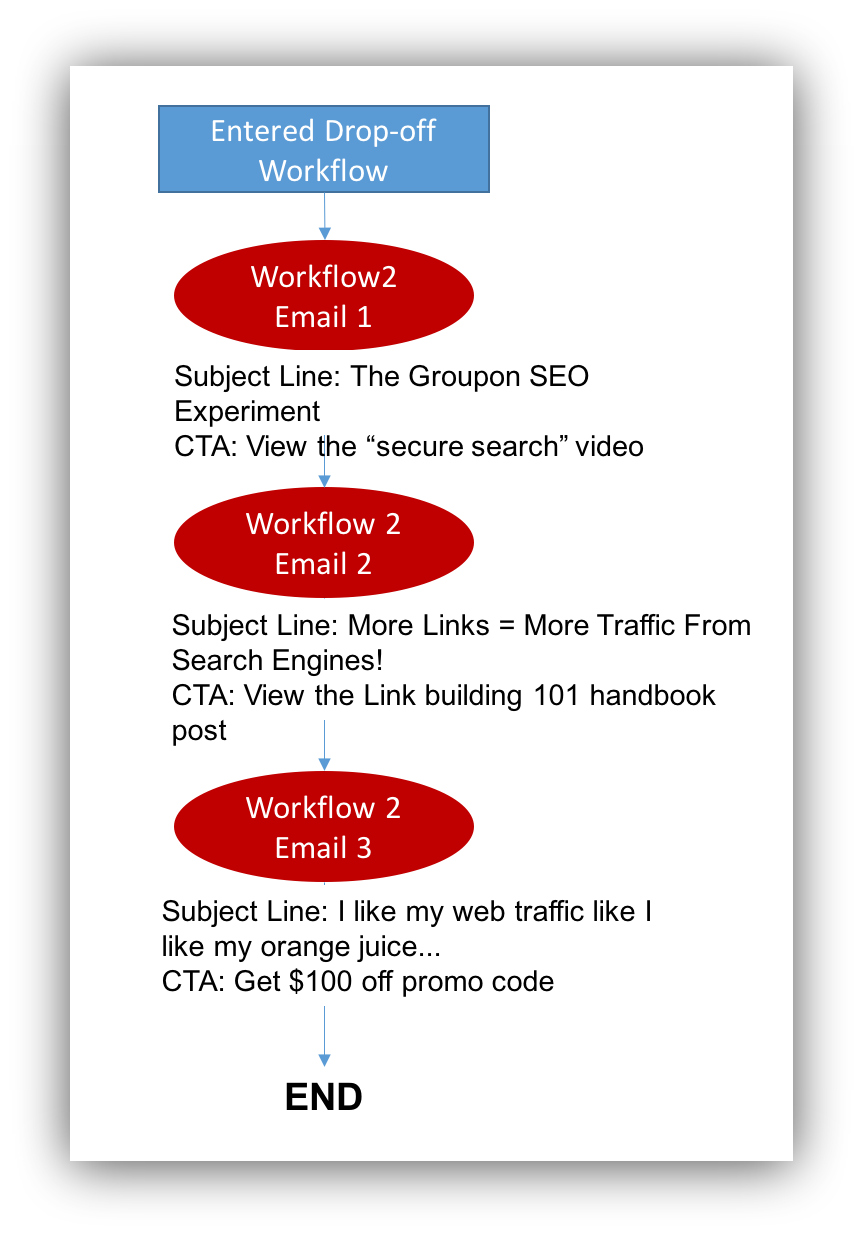
As I mentioned, emails collected in our drop-off page went to a separate email list (the “drop-off list”) within MailChimp. Any new subscriber added to this list would trigger an email sequence as well, which we set up following the same steps described above.
In this case, we decided to send way more specific content that would suit people lower in our “marketing funnel” – remember that these people had already seen a demo of our course -, let’s call this the “drop-off workflow.” We also included a promo code at the end of the email sequence. Here’s what this sequence looked like:
If you’ve gotten this far you’re only one step away from finishing! Success is at sight and you should smell it already – sort of like this guy.

Step #5. Automating Subscriber Segmentation (Total Time: 10 Minutes)
Now that you’ve created two different email sequences for different subscriber segments, you will need to make some adjustments to have both these processes co-exist without spamming your subscribers.
There are several considerations here:
- You don’t want the same visitor to be part of both sequences simultaneously. These should be mutually exclusive to reduce spam.
- If a visitor subscribes to your primary list and then gets to the drop-off page without purchasing, you might prefer this person to be switched to the sequence that is specifically designed for higher-value subscribers instead of leaving them in a more generic content-type sequence.
- Since there is a promo code at the end of each email sequence, you want to stop it if the subscriber completes the purchase before receiving this final email – think of how you feel when you buy a piece of expensive technology and the company drops the price the day after.
It would be very hard to keep track of all of this manually, so automating subscriber segmentation is the way to go.
To explain what we wanted to achieve, check out this diagram that shows the two email sequences and their desired coexistence behavior:
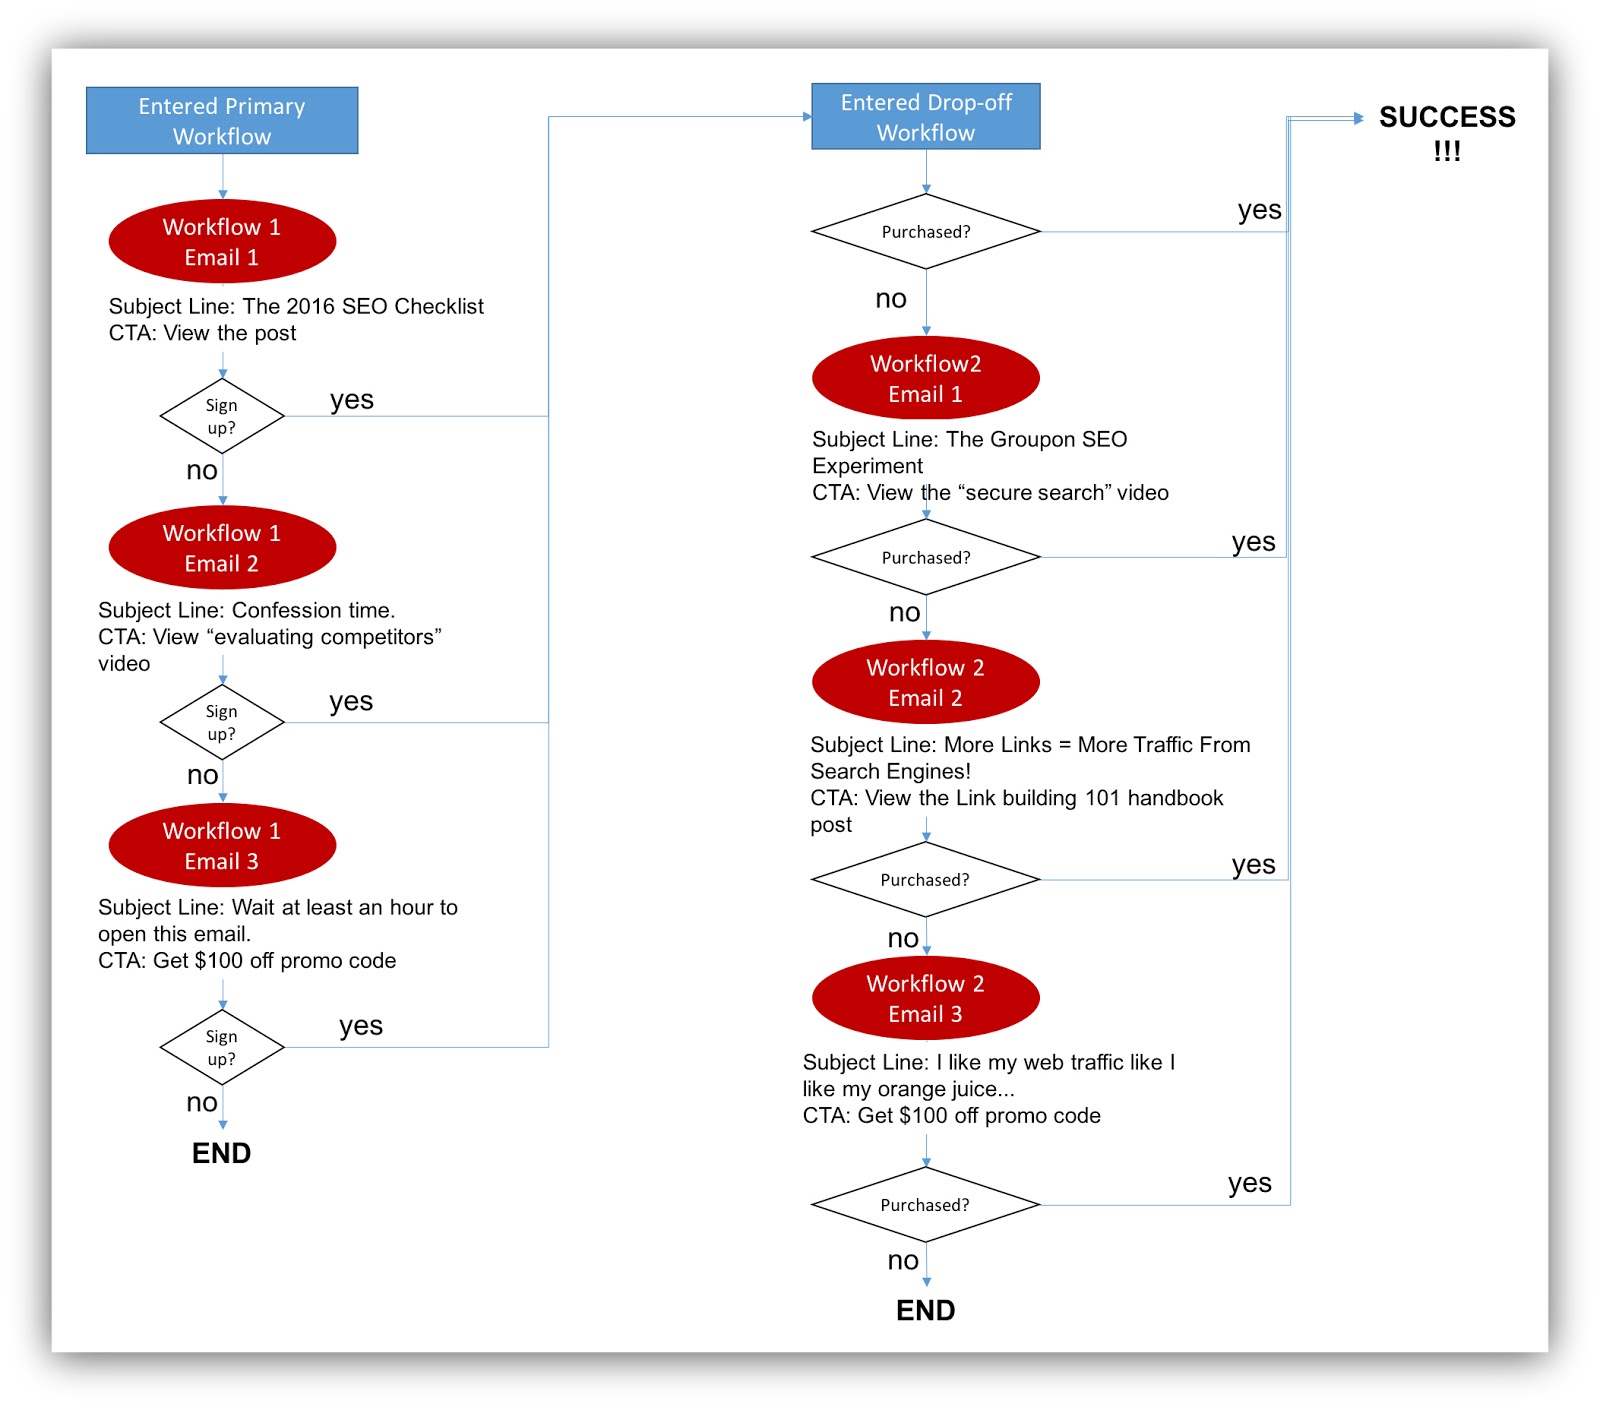
That is one beautifully looking flowchart, isn’t it? Create your own flowchart to visualize your automation process. Frame it and hang it on your wall. Take a picture of it and send it to your mom – this is your baby and she’s a grandma now.
Time to teach this kid how to walk on his/her own.
Creating Segments
Mailchimp, as well as many other email marketing tools, provides the option to create segments within your subscriber lists. In our case, we created the following:
- The “primary list should have a general segment for people who have only subscribed to this list and one segment for people who also belong to the “drop-off list.” These are the names of the segments:
- Requested content
- Dropped-off
-
If any subscriber matches the criteria to join the “Dropped-off” segment, a trigger should go off to stop the “primary workflow” for that subscriber.
-
The “drop-off list” should also have a general segment and another one for people who have completed the purchase (notice that anyone who purchases will necessarily be part of this list.) These are the names of the segments:
- Dropped-off
- Purchased
-
If a subscriber completes a purchase, then s/he should be taken off the “drop-off workflow.”
There are several ways to create dynamic segments – this means that they update automatically – in MailChimp. We chose to do this using groups: We created groups within our two lists, and the segments would update if a subscriber were a member of a specific group.
Here’s how to get that set up.
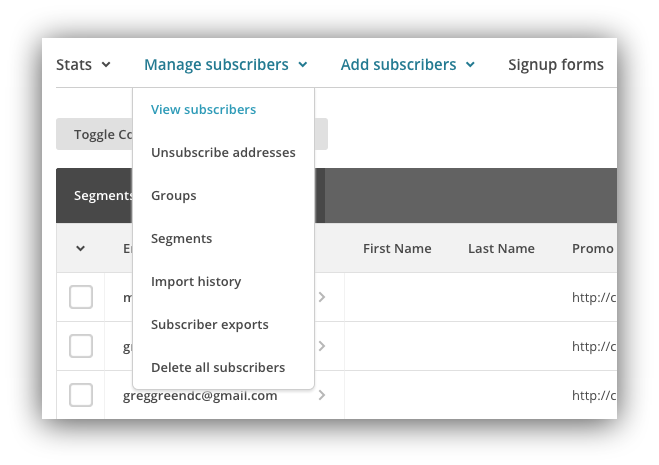
Within MailChimp, click on “Lists” on the top navigation and select the “primary list.” Then click on “Groups” under “Manage subscribers.”
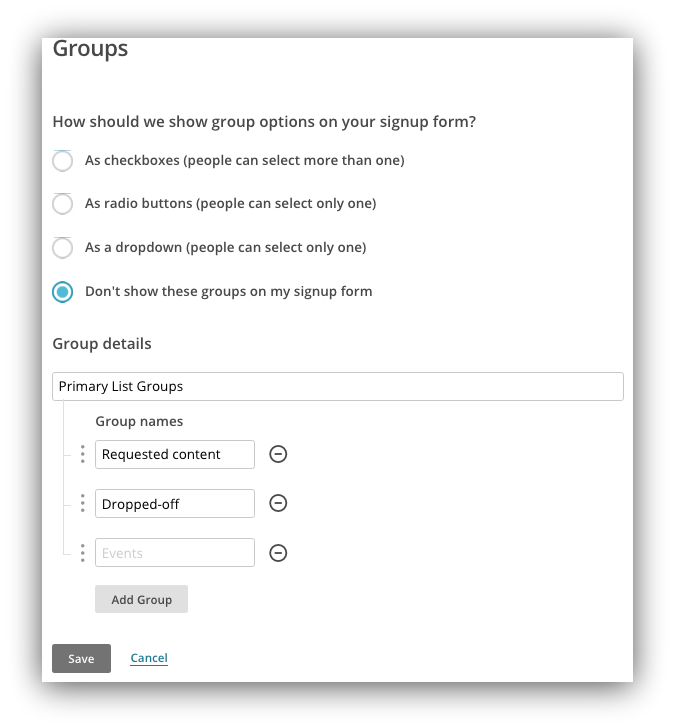
Select to create groups and name your groups with the same names of the segments of the list and save (it is irrelevant how you choose to show group options in signup forms since you’re using Sumo anyway.)
Go back to your “primary list”, now click on “Segments” under “Manage subscribers” and create your first segment. You will see this:
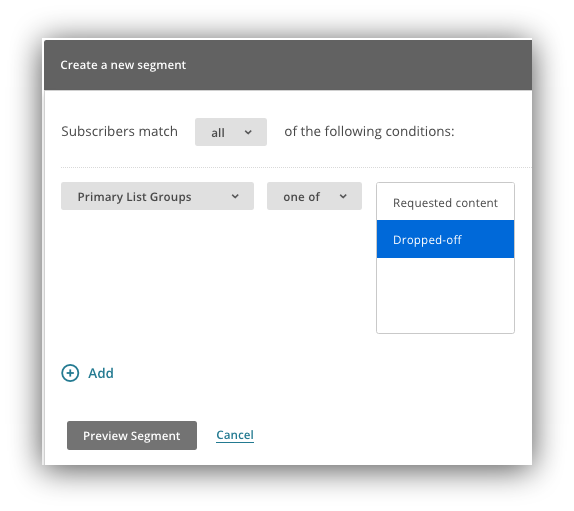
Instead of using “Date Added” as criteria for the segment, select the groups you just created from the drop-down

Select “Dropped-off” as the matching value and hit “Preview segment”.

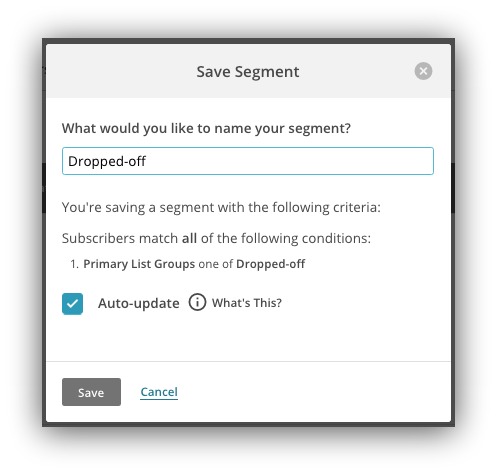
You will see that no one matches the criteria for the segment yet (which is to be expected at this point.) Now click on “Save Segment,” name it accordingly and make sure that “Auto-update” is selected.
Now repeat this process for both segments in both lists and you’re ready to automate this thing!
Automating Segmentation
Now comes the time to automate placing and updating each subscriber in one of these segments.
We solved this problem using Zapier. If you haven’t heard of it, it’s essentially an app integrator: a trigger in “App A” can generate an action in “App B” – and they call this a “zap.”
If you don’t like Zapier, you can also try Cloudpipes, which offers a very similar set of integrations with a much more visual drag and drop interface.
By now, you’ve probably already gotten the hang of this: We needed 2 zaps to segment the subscribers:
Zap #1: To segment the subscribers in the “primary list”
- Trigger: a subscriber joins the “drop-off list.”
- Action: add the subscriber to the “primary list” under the “dropped-off” group.
Here’s how that looks on Zapier.
Once you’re in your account, click on “Make a Zap” – you will see this screen:
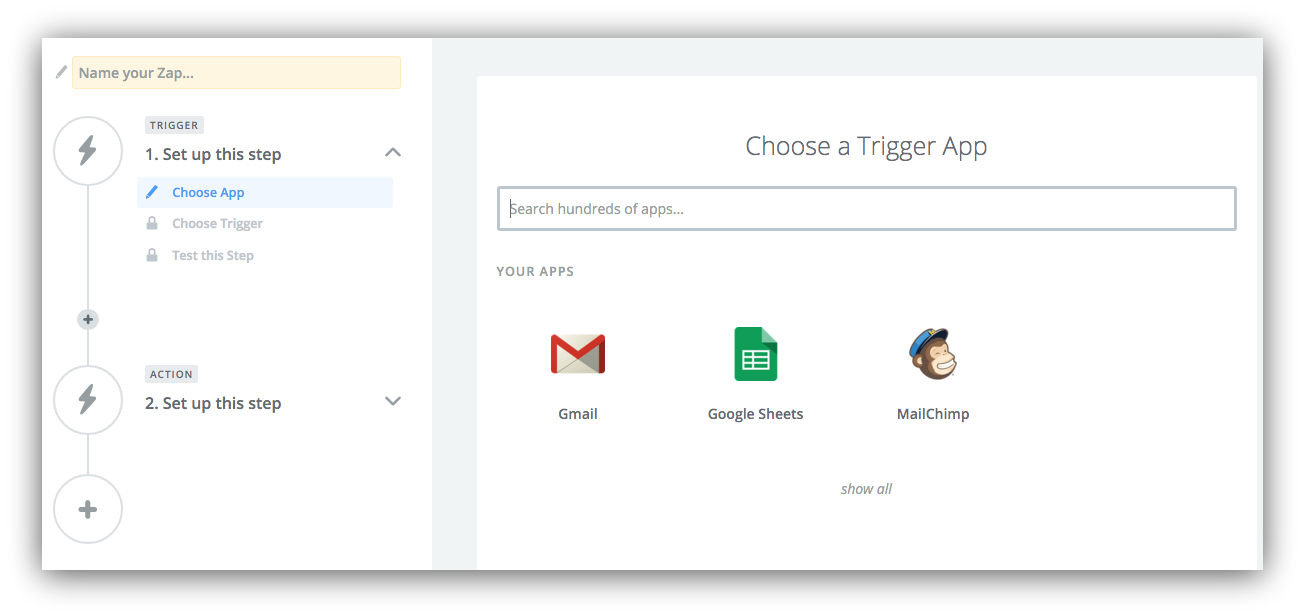
If this is your first time using Zapier or using MailChimp within it, you will need to sync your account.
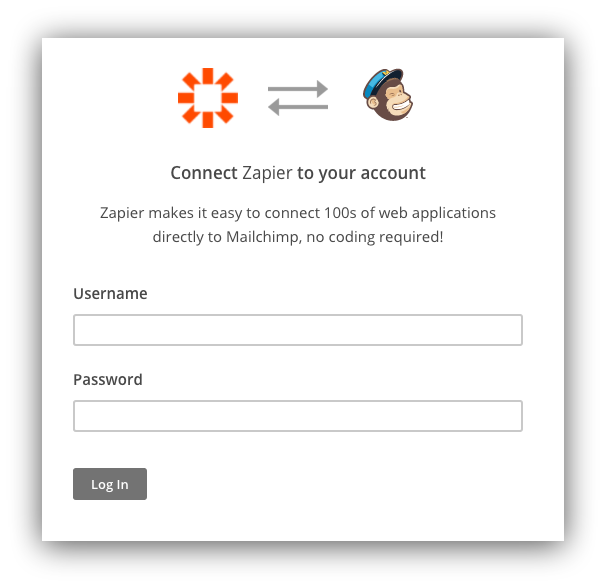
To set up the first step of the zap, select MailChimp as a Trigger App and choose “New Subscriber” as a trigger.
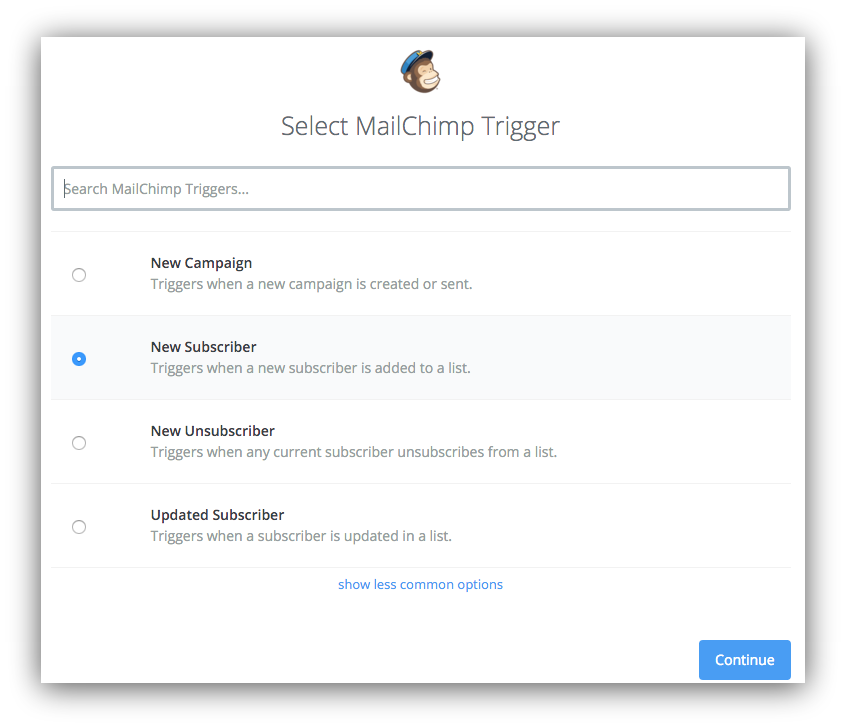
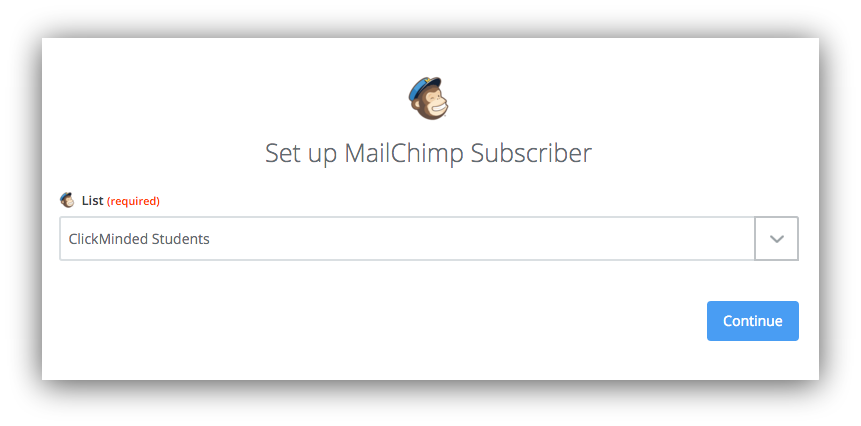
Select your “dropped-off list” for the trigger and let Zapier test that everything’s working.
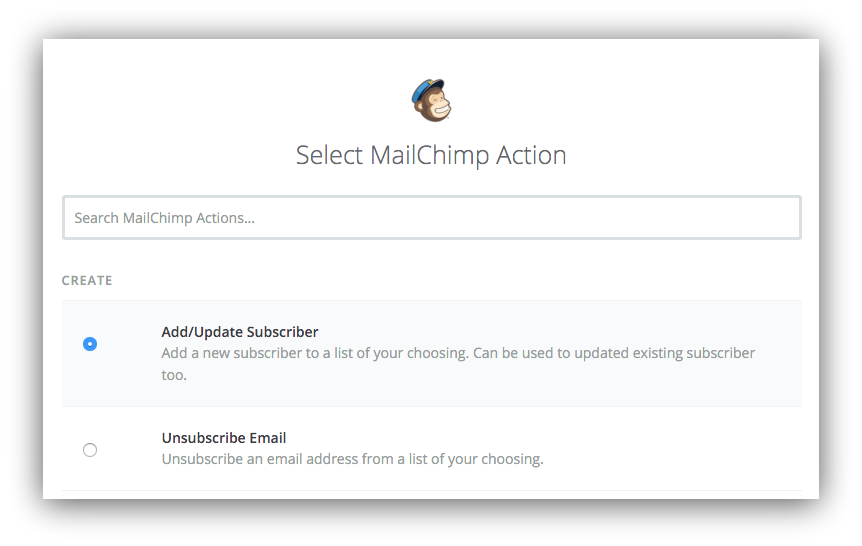
Now let’s move on to the action. Select MailChimp again as the Action App and pick “Add/Update Subscriber” as the action.
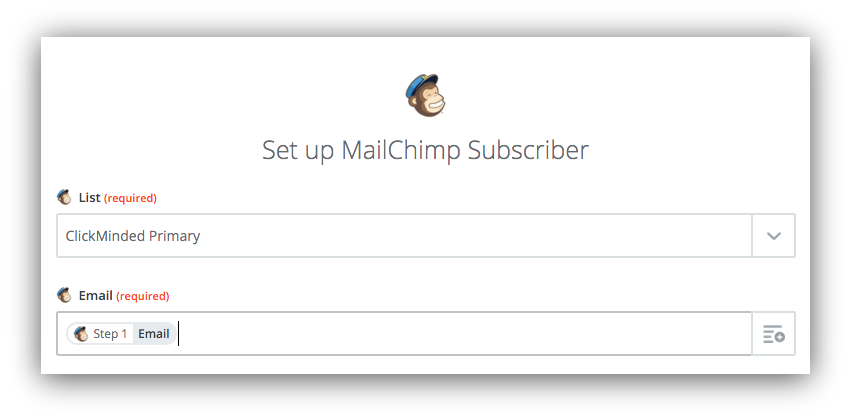
You will be asked to select your MailChimp account again, and then you need to set up the template for the new subscriber. Select your “primary list” for the new subscriber and in the email field, select the email address that Zapier pulled from step 1 (the trigger.)
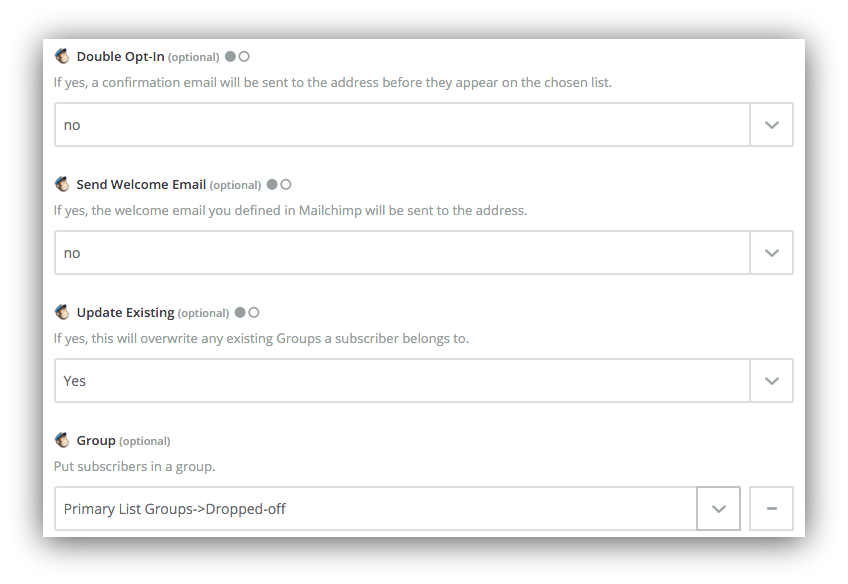
Scroll down and select “no” on double opt-in, “no” on welcome email, “yes” on updating existing subscribers, and, the most important one, pick the “Dropped-off” group.
Let Zapier test everything, turn on your zap and… You’ve automated subscriber segmentation on the “primary list”!
Now repeat this process to automate segmentation in your other list.
Zap #2: To segment the subscribers in the “dropped-off list”
- Trigger: a subscriber purchases (you can use Stripe or PayPal as trigger apps)
- Action: add the subscriber to the “dropped-off list” under the “purchased” group.
Selectively Delivering Emails
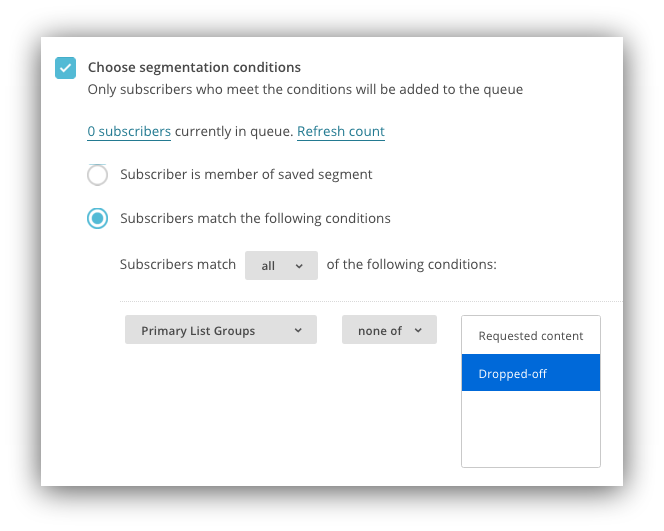
Once subscribers are automatically segmented, all you need to do is select which segment should receive each email. This can be easily done in MailChimp by using segmentation conditions in each email within your automation workflows.
For example, in your “primary workflow”, click to “Edit Design” of your emails and in the last step, “Scheduling and Segmentation”, pick “Choose segmentation conditions” and exclude subscribers who match your “dropped-off” segment.
Repeat this for your emails in the “drop-off workflow” and you’re done. Finito. Fin. You’ve built your very own marketing automation process to nurture subscribers.
Now chill back, crack open the champagne, and watch the money come in.

Or… Not.
Truth be told, you will never be done.
As much as this boosts acquisition for your business, there will always be room for improvement. Now that you’ve set up this process you can start optimizing each step to increase conversion.
Bonus #1. Optimizing Email Collection
The first step (after creating awesome content) is to convince people to give you their email. We’ve already mentioned how awesome Welcome Mat is in achieving this, but there is still a ton of stuff you can try to optimize – especially with its built-in A/B testing functionality.
These are some of the variables we’ve tested:
Value proposition
Images vs no images
Call to actions
Dismiss options
For a great case study about this, check out how Teachable increased their signup rate by 70%.
Bonus #2. Optimizing Your Email Sequences
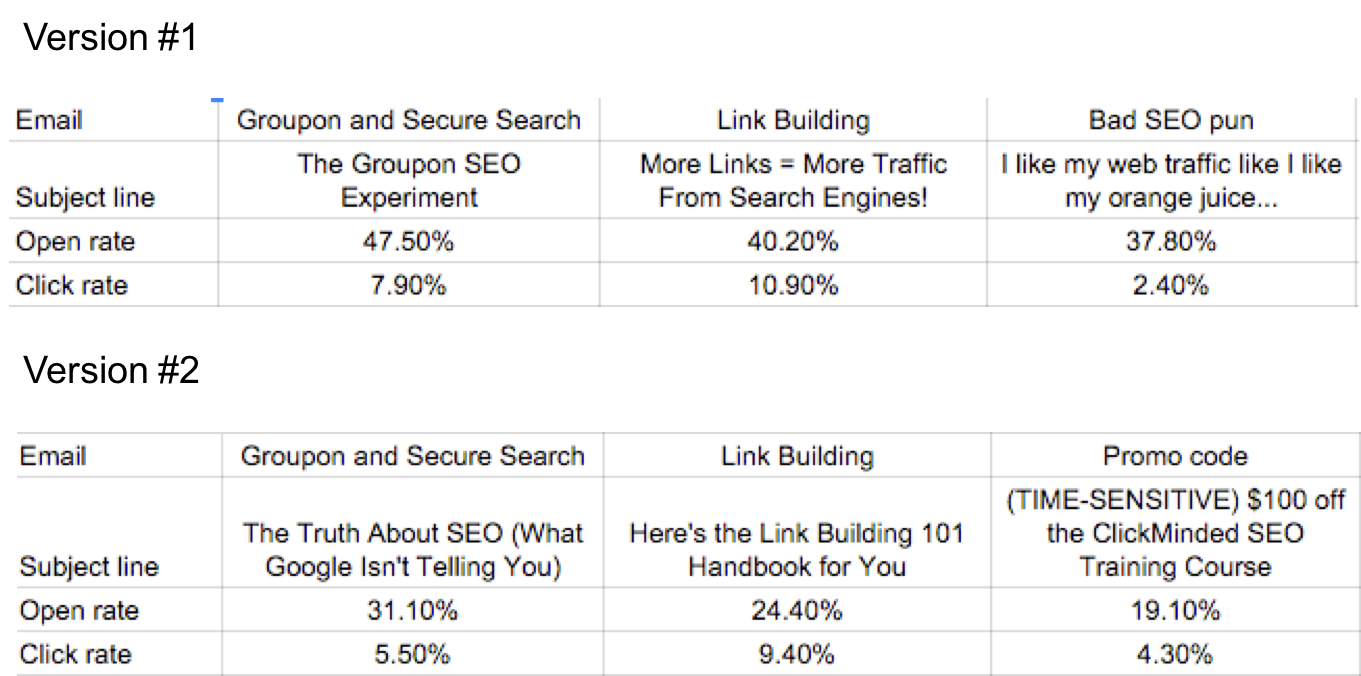
Now that you’re optimizing email collection, you can keep moving lower in the funnel. The next barrier lies in email open and click rates, for which you can test and optimize your subject lines, copy and CTAs. Check out how our metrics have changed for different versions:
Primary Sequence – Check out how we improved click rates!

Drop-off Sequence – Woops! Our V.2 performed significantly worse than V.1 in most aspects (we’ve reverted the change since)
We are now running V.3 of our workflows, and we keep on testing new approaches!
If you’re looking for ideas, I suggest you check this awesome post on 15 awesome emails to send your subscribers.
Time To Build Your Own Email Marketing Machine!
Are you ready to stop working harder and start working smarter?

Take one hour of your weekend and set up your own email marketing automation machines.
Here are the steps to follow:
Step #1: Find Your Most Valuable Piece Of Content
Step #2: Capture The Emails
Step #3: Pay Attention To Your High-Value Visitors
Step #4: Create email sequences
Step #5: Automate Subscriber Segmentation
Have you tried creating something similar? Share your results! I would love to hear from you in the comments below 🙂


Add A Comment
VIEW THE COMMENTS