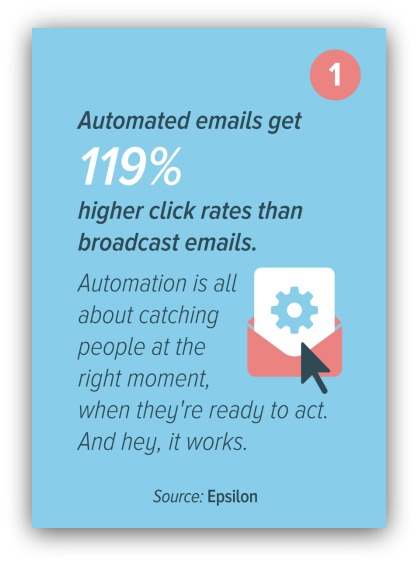
Did you know automated emails get 119% higher click rates than regular emails?[*]
To quote Martha Stewart, “That’s a good thing.” You want people to click the links in your emails, right?
So why on Earth would you ignore the most engaging email method around?
Remember: automated emails are sent when a visitors triggers an action (opting-in, visiting a page, etc.). Broadcast emails are sent when you physically hit the “send” button.
And look. When I say “you” I’m not reaching through the screen and poking you in the shoulder. Because, on average, only 49% of companies are currently using marketing automation.
The whole point of automation is to create a system where you don’t have to do anything yet you still get traffic and sales. It's a huge pain in the butt to continuously write emails for your list — especially if you have to send an email to every new subscriber. Automation monitors and sends on your behalf.
So if you’re reading this and you don’t use email automation, you’re not alone. Because even after I’ve cited stat after stat about the glory of automated emails, I still get the same response:
“Yeah, But I Don’t Think My Business Is Quite Ready For Automated Emails.”
Here’s what I know. That response doesn’t usually come from knowing you don’t want email automation.
It comes from being a bit intimidated by automation.
Whether that’s the intimidation of setting it up or the intimidation of not knowing how it really works, it’s intimidation that holds most people back.
So let’s not focus on intimidation. Instead, shift your mindset for a second and yourself these five things:
1) Do you want better results from email marketing?
Of course you do. You aren’t writing those emails for the trash can.
We know automated emails are opened more than broadcast emails — emails you distribute by pushing the “Send” button. Why?
Automated emails are relevant.
Read that again. Automated emails reach the right people at the right times. Someone puts an item in their cart but leaves the site? Boom — you can set up an automatic reminder email to come back and buy. It’s all about relevancy:[*]
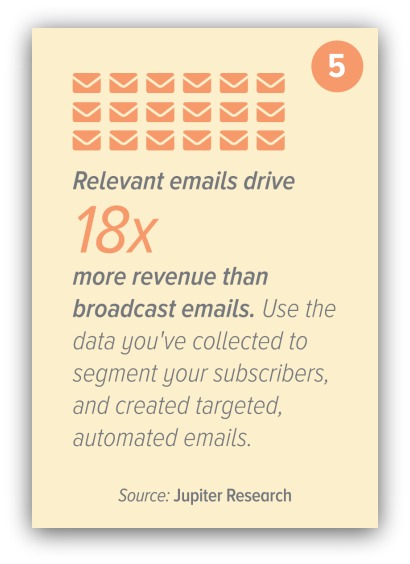
You can’t ignore 18x more revenue. That turns $1,000 of revenue from a broadcast email into $18,000 from automated emails.
2) Do you want to do less repetitive tasks so you can focus on cooler projects?
No one likes tedious, repetitive tasks. They cut into your productivity and drag you away from things you like to do.
So instead of digging into a spreadsheet, finding an email address, pasting that into an email, writing an email and hitting send, you can cut literally all those steps out with email automation.
An automated email does all those steps for you — all without you ever lifting a finger.
3) Do you want to talk to the right customers?
You know that feeling when you write a bomb email with, as Donald Trump would say, “All the best words?”
Then that email proceeds to get opened by 1% of your list?
I’ve summarized that feeling in one GIF we can all relate to:

It doesn’t matter how good your email is if it’s not reaching the right people.
Automation helps you reach your right audience every time. Your well-written emails are sent to the people most-likely to engage with your message.
4) Do you want your customers to like your business more?
I swear, if you answered “no” to this then we’ll need to talk about your business in general.
You might wonder how email equates to people liking your business more.
Easy. It’s about the customer experience. Take this for example:[*]
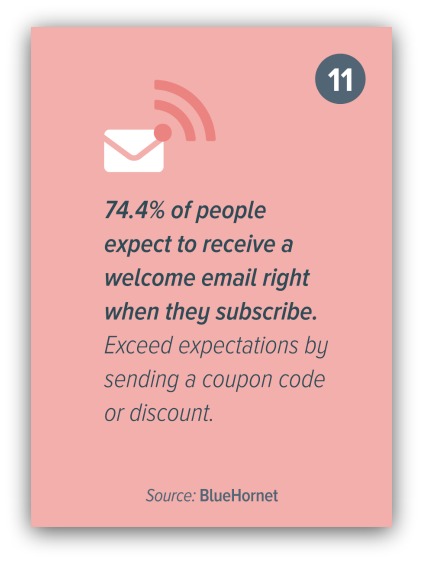
74% of people expect to receive a welcome email when they subscribe to your site. If you weren’t sending automated emails, you’d be glued to your screen monitoring new subscribers and personally sending them emails.
You don’t have time for that. And people would surely slip through the cracks. On the other hand, an automated email would send that welcome email on your behalf to everyone that subscribes.
That’s handy, and it makes for a better customer experience. I.e. people like your business more.
5) Do you want to make fewer mistakes?
Hey. Remember when you sent an email with a typo? That was embarrassing, huh?
A major typo in an email can feel like you busted into that person’s office and yelled “WE R GUD PLEASE BUY MY PRODUCT HUR HUR.”
The more emails you send, the greater your chances of a soul-crushing typo. Automated emails cut that risk because you’re sending the same email over and over to new people. Nail it once and never worry again.
Odds are you read through and wanted at least one of those five realities. If you want that, then we’ve got to stare down automation intimidation and make it flinch first.
Good news. Sending your first automated email is surprisingly easy. And once you know how to do that, then setting up large sequences comes shockingly naturally.
So stick with me through this guide. I’ll demystify this whole email automation process and show you the exact steps behind setting up your first automated email. And I’ll do it for each of the seven major ESPs (odds are you’re using one of these).
- How To Send An Automated Email With Active Campaign
- How To Send An Automated Email With Aweber
- How To Send An Automated Email With Constant Contact
- How To Send An Automated Email With ConvertKit
- How To Send An Automated Email With GetResponse
- How To Send An Automated Email With Hubspot
- How To Send An Automated Email With MailChimp
How Are You Connecting With Your Subscribers Right Now?
Good question.
I’m assuming you’re already collecting emails through some sort of opt-in opportunity. If not, read this excellent piece that ranks all the ways to collect emails.
If you are collecting emails, then let’s be upfront. Maybe you use Sumo tools like Welcome Mat, Smart Bar, List Builder and Scroll Box to collect emails. Maybe you don’t.
I’m not here to judge (in writing, at least).
Whether you are or aren’t using our tools, almost every email collection tool directs addresses one of two ways:
1) Your Emails Sit In A Spreadsheet
If you don’t have an email service provider hooked up to your tool, then the addresses you collect usually go to a spreadsheet.
You download that spreadsheet and get access to every email address you collected with that specific tool.
Then you upload those email addresses to your email service provider. From there, you can mass-email those contacts.
This doesn’t work for email automation.
The whole point of automation is to create a system where you don’t have to do anything. If you have to upload a list and then send an email, you’re doing two things that automation could take care of by itself.
That’s why you want your emails doing this….
2) Your Emails Move To A List
This is the key to automated marketing. It’s the connection between your site and your email service provider.
What changes in this scenario is where your emails go. Instead of sitting in a spreadsheet, they go directly into a list in your email service provider.
It looks like this:

The first thing you see is a list of email service providers. You click on one of those to integrate (read: connect) your ESP to the email collection tool.
After you connect the ESP and the tool, you’ll see something like our “Mailing List” dropdown. That just tells the tool what list to send the email addresses to.
QUICK TIP: You can create lists for any situation. If visitors opt-in for a content upgrade, you can make a list for that specific content upgrade and the email addresses will go in that list. It’s a handy way to organize your subscribers.
When you go into your ESP, you’ll see the addresses in the list you created:
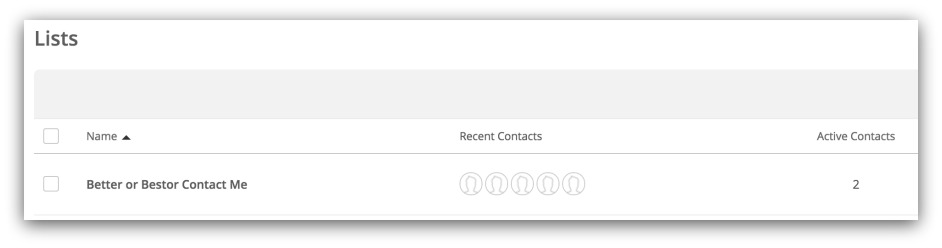
VOILA! Just like that, the addresses you collect seamlessly flow into a list.
But…they’re just sitting in that list unless you create some automation.
So let’s do that.
How To Automate Your First Email: A Walkthrough Of 7 Email Service Providers
Wow, Sean. Way to take 1,200 words to get to this point.
I know, I know. But the buildup is worth it. Because now you’re ready to send your first automated email.
Real quick, just remember these two terms (I’ll use them a lot in this guide):
-
Trigger: This is what makes your email send. It can be anything from someone joining your list to an amount of time going by to even if they don’t take action for a while. Once the action you set “triggers,” your email goes out to that person.
-
Campaign: This is what you call the finished product. A campaign is your entire automation — the trigger, the email send and anything else you choose to include.
One other thing. I gave you a lot of reasons why you should use email automation, but I didn’t give you specific ways to use automation.
THAT could be a whole other article. For now, check out these excellent ways from MailChimp on how to use automation:
-
When a subscriber signs up for your list: Welcome new subscribers with a single email—or a series—to help them get to know your company or organization. Tell them what they can expect in future newsletters, send a special coupon, or give them tips on how they can take advantage of everything you have to offer.
-
When you have a series of emails: Maybe you have educational content, like an online course, that needs to be sent out on a regular basis over a period of time. Break that information into a series of steps that can be sent over days, weeks, or months.
-
When you need to send an email once a year: This might be for a subscriber's birthday or an anniversary. Set the workflow to send annually, and we'll take care of the rest.
-
Following up on website activity: When a subscriber navigates to a specific link on your site from a newsletter, automatically send them follow-up information using Goal. Help them make a purchase decision, thank them for downloading your latest song, or send a survey about their experience on your website.
-
When you want to thank your best customers or most loyal fans: The customers who purchase from you on a regular basis are important to your business, so let them know they're valued. Send a simple thank you, invite them to a special VIP program, or offer a discount.
-
Follow up after a purchase: Send additional product recommendations or product care tips based on what your customers have purchased.
-
When you want to get feedback: Use a survey to make your customers feel valued and get important feedback about their shopping experience on your site.
-
When you want to create a win-back campaign: Develop a series of win-back emails to encourage inactive subscribers to re-engage, and utilize post-sending actions to automatically perform a specific list action on subscribers after they receive the final email in the series. This could be used to update one of their merge fields, move those subscribers to a different interest group, or to remove them from your list completely.
Lots of options, right? For this guide, I’m going to simplify the process and focus on sending a generic automated email. You can use your imagination and picture any one of the above emails being sent.
Ready? Let’s dive in.
How To Send An Automated Email From Active Campaign
I’m creating this list alphabetically. But if I wasn’t, I’d still put Active Campaign at the top of my list because I heart them big time.
Their automation is only available to paid customers (like almost everyone on this list), but it’s one of my favorite systems because it’s incredibly easy to use.
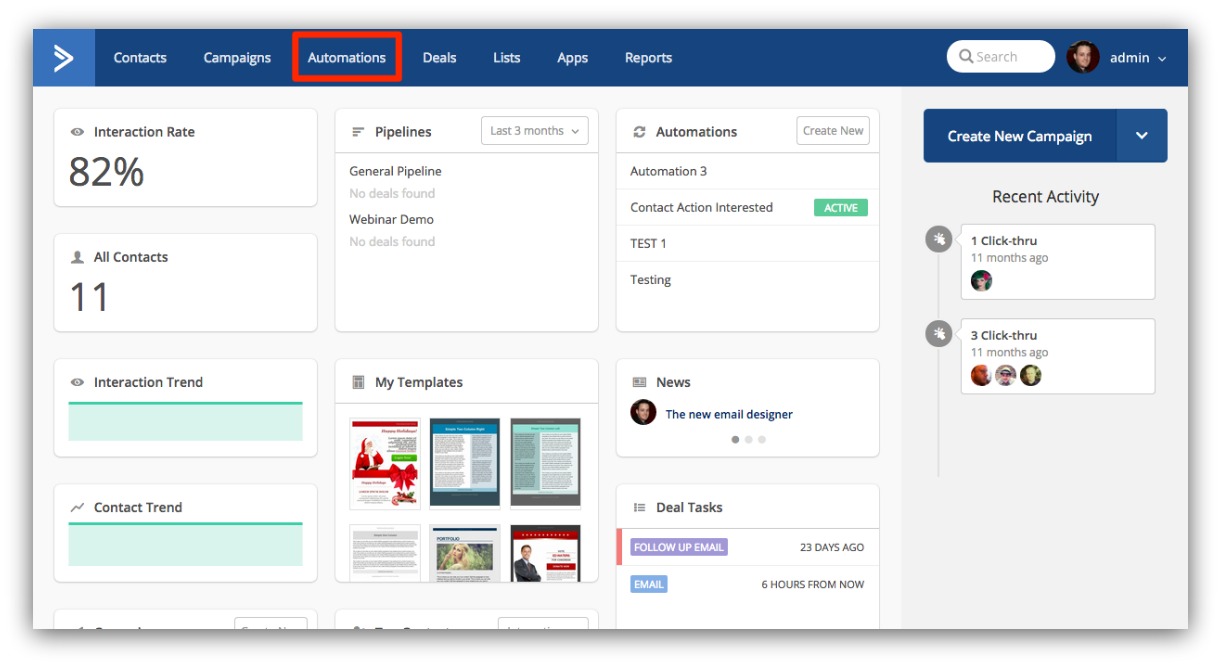
Here’s how it works. You log into your account and click the “Automation” tab in the menu:
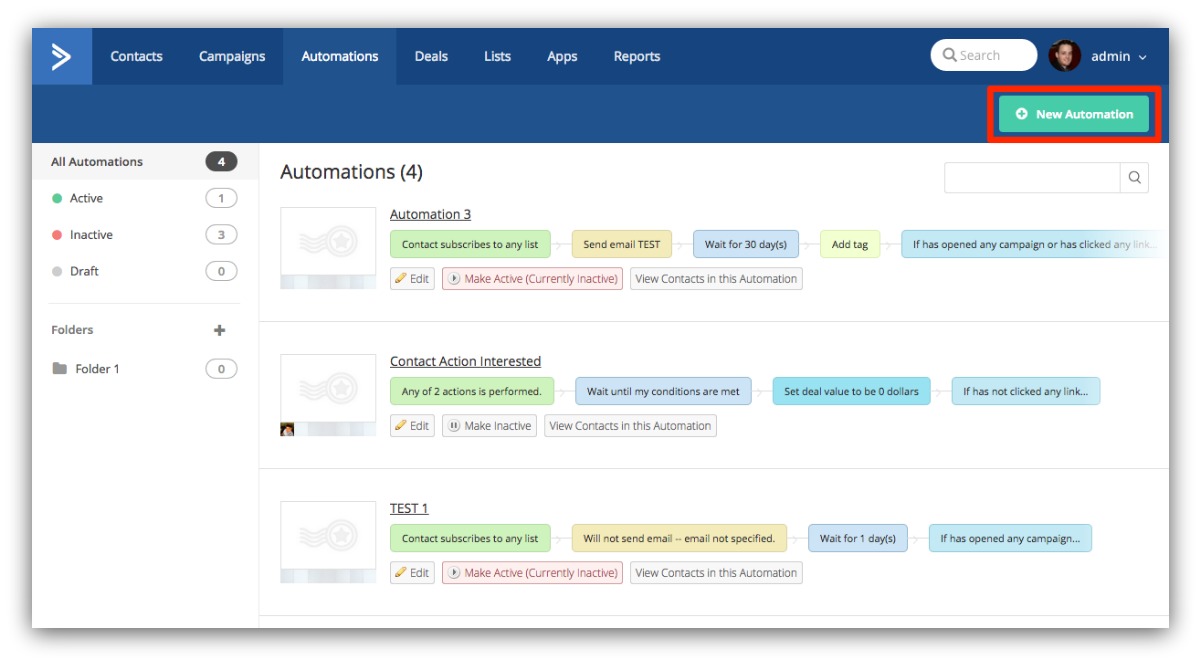
Then you click “New Automation”
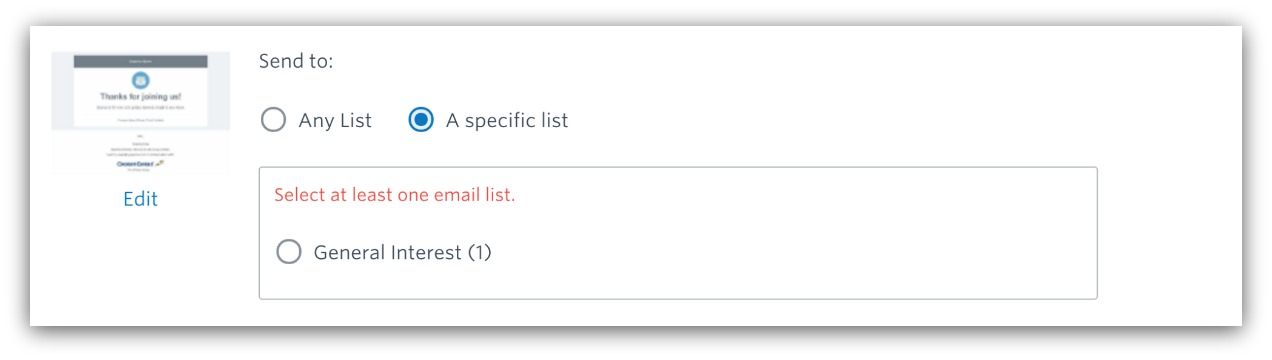
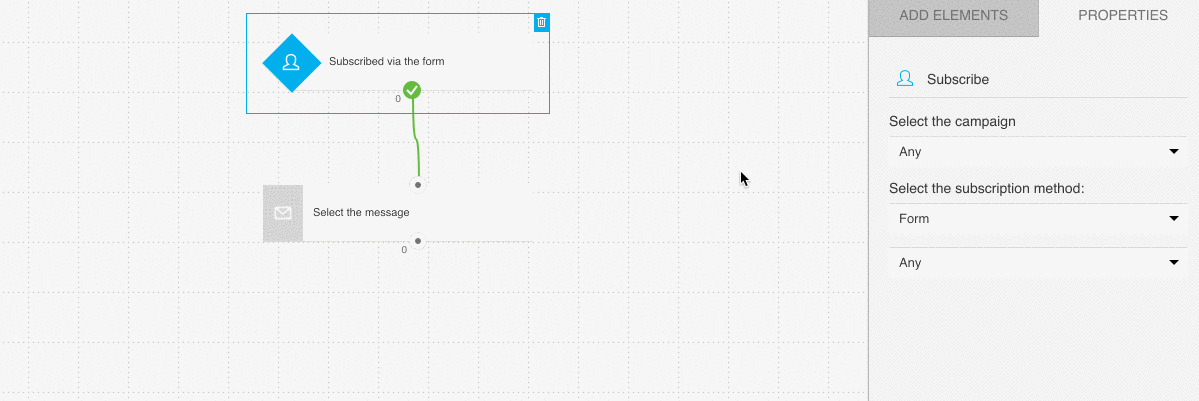
And a pop-up window will appear. It’ll ask you what list you want to use in this automation. Remember this step:
You want to select the list you chose when you setup your email collection tool. After you choose your list from their drop down menu, you go to this screen:
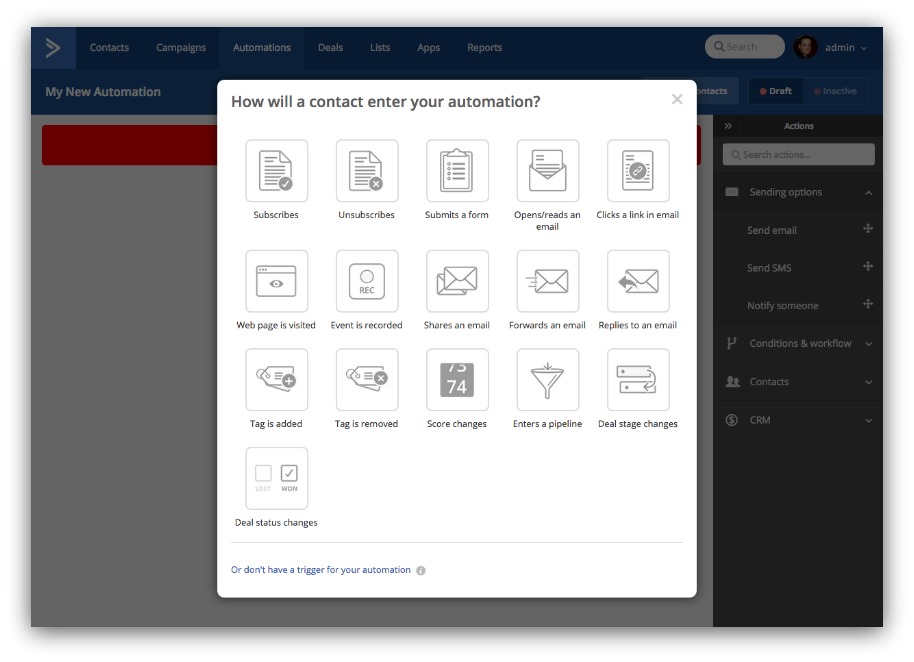
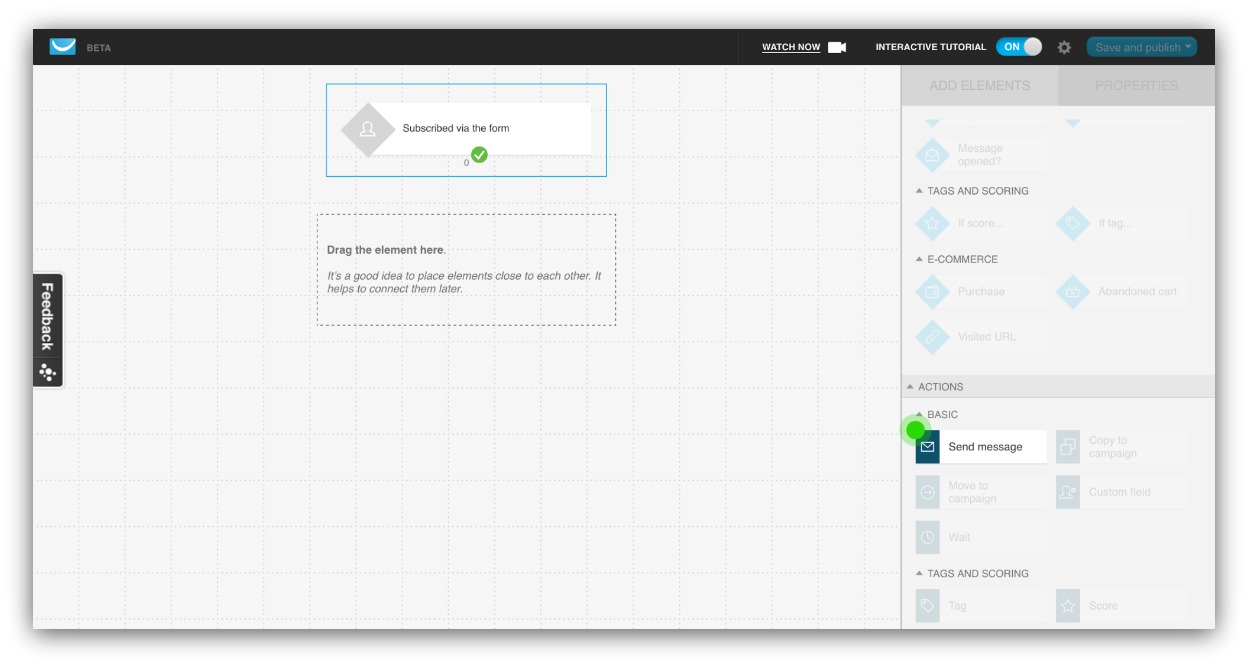
These are the building blocks of Active Campaign automation. These are your triggers — the actions that signal your email to send. There are loads you can choose from, but let’s focus on the “Subscribe” option at the top left corner.
This is the beginning of your automation. Think of it like an “If this then that” statement. If this thing happens, then something else has to happen. For every action, there is a reaction (thanks middle school science).
Your trigger is the “this.” By selecting “Subscribe,” you’re essentially saying “If someone subscribes to my list, then _.”
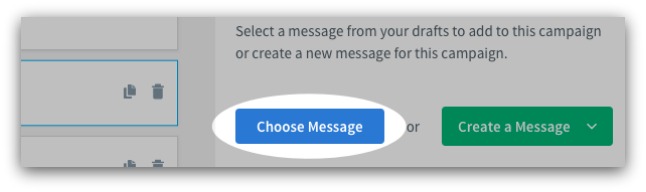
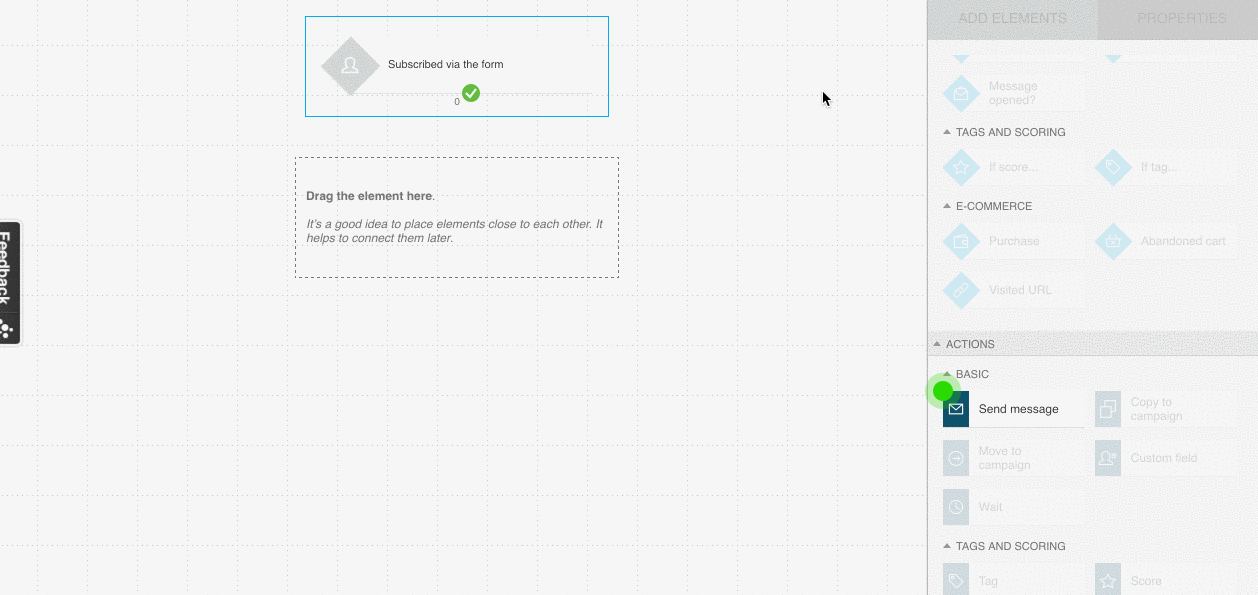
Now we need to fill in the action or “that” of the statement. For us, that’s sending an email:
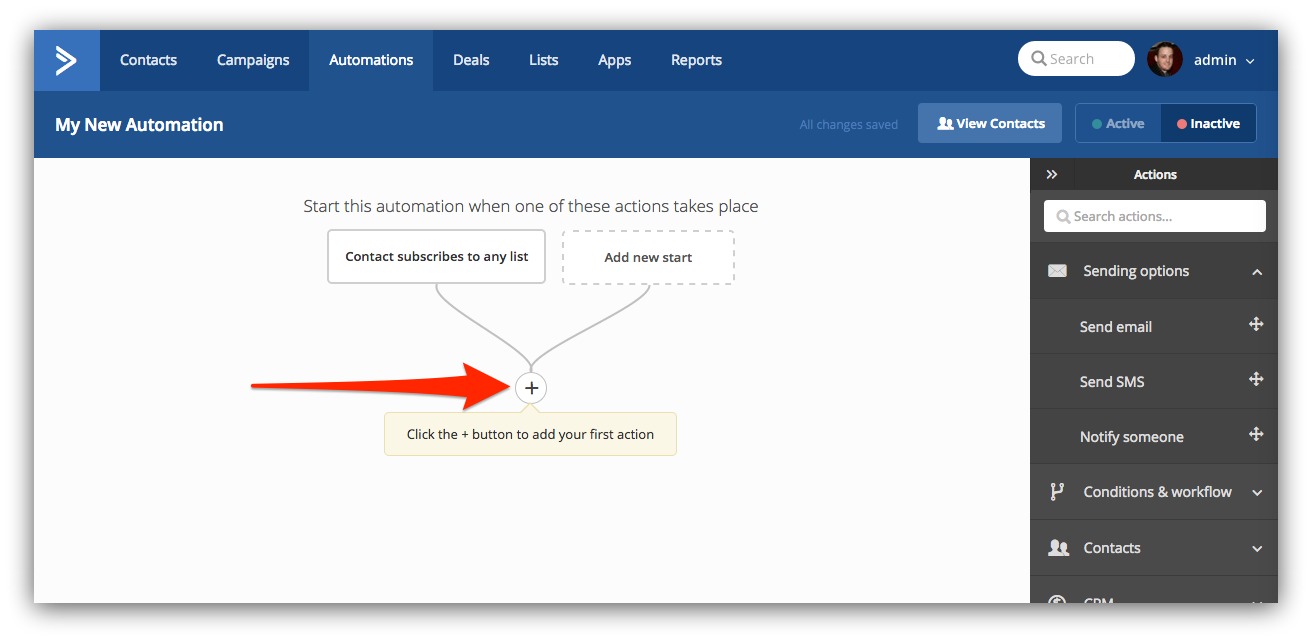
You click the plus sign at the bottom of your first statement, and you get this window:
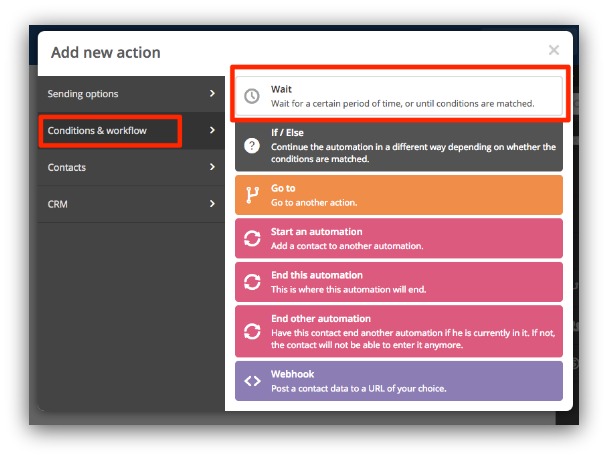
Again, there are a bunch of conditions we could dive into. But what we’ll do is focus on the “Sending Options” tab and click “Send Email.”
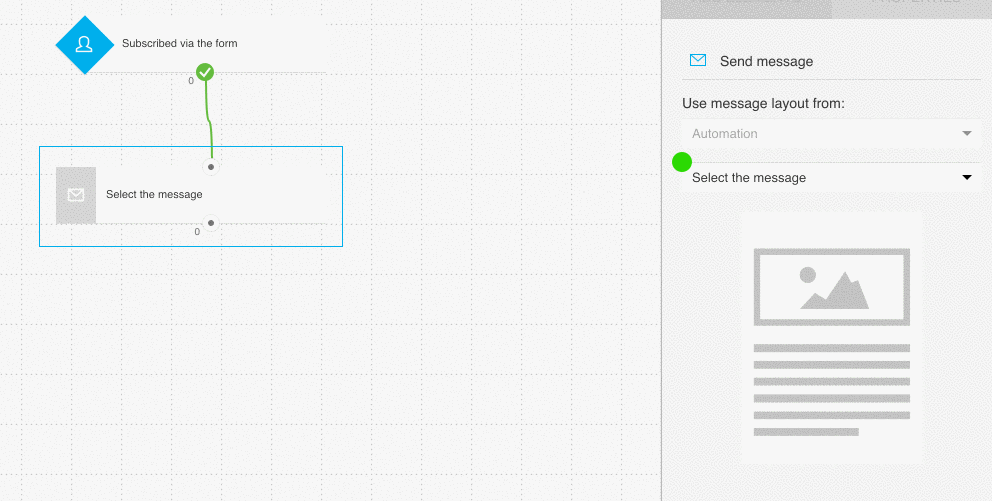
This is where you create your email to send out. This is the action we looked for in our statement. Now that statement would be “When someone subscribes to my list, they receive an email.”
Active Campaign has a ton of pre-made email templates at your disposal if you don’t want to mess with creating your own. I’ll leave the email awesomeness up to you.
Once you’re done writing and designing your email, you hit “Save” and you’ll see your full automation:
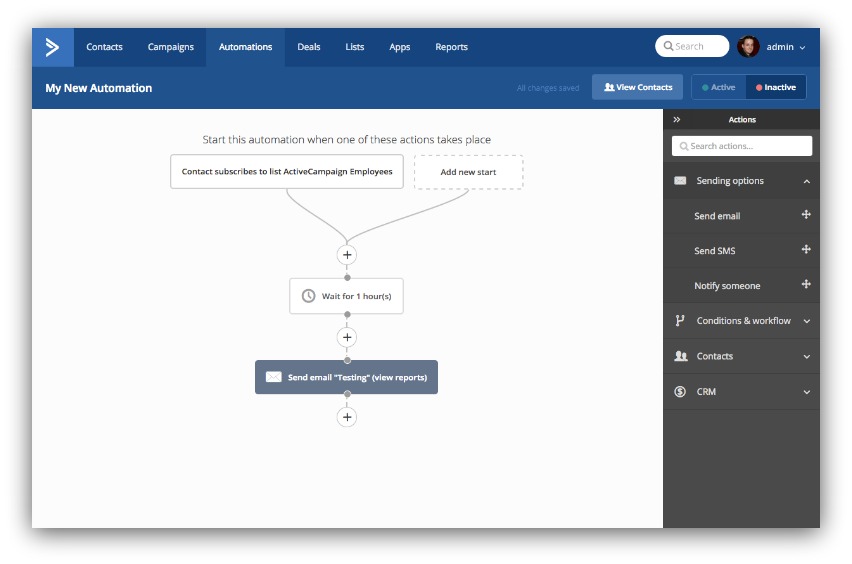
Forget the “wait for one hour” part.
And that’s it! You’ve just set up your first automated email in Active Campaign.
If you want more complex automations, you can import pre-made sequences from this post on Active Campaign.
Grab this free 32 page Ebook on “15 Types Of Emails You Need to Send Right Now”
How To Send An Automated Email From AWeber
What’s up, AWeber folks? Way to choose the ESP that revolutionized the autoresponder game wayyyyyy back in 1998. We call that some OG email marketing.
Since they’ve been around the email marketing game for a long time, you better believe their automated marketing is easy to set up.
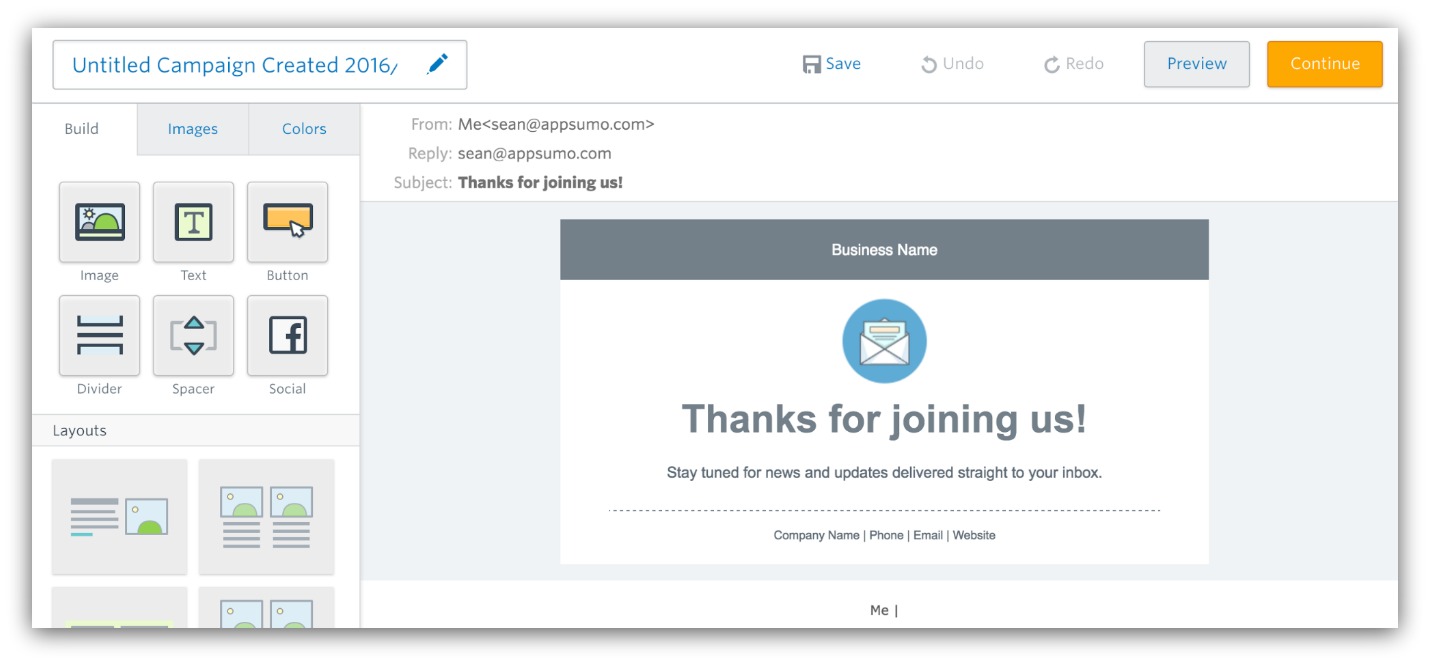
Though their process is different from most ESPs. They want you to create your emails before you go through the automation process.
So create your email like you regularly would. However, instead of choosing a list and hitting “Send,” hold up and simply hit “Save.”
Once your email is created, you move onto the automation phase. To do that, go to your messages tab and click “Campaigns”
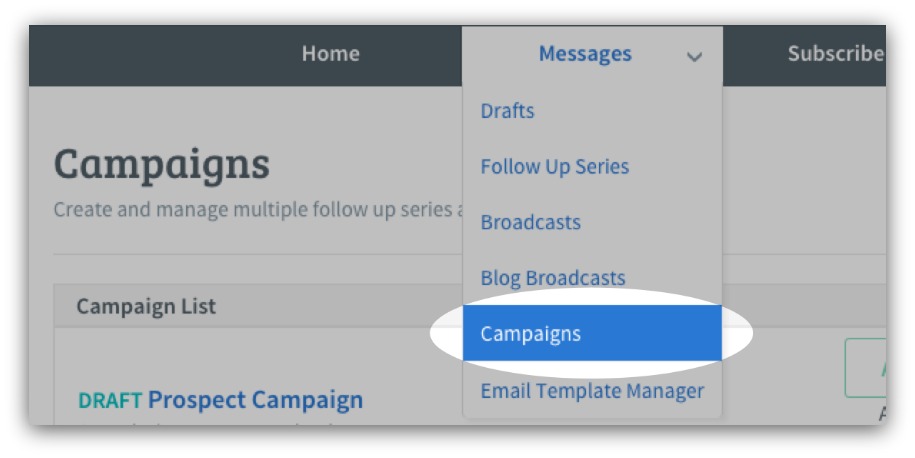
Then select the big “Create Campaign” button. Once you name your campaign you see this screen:
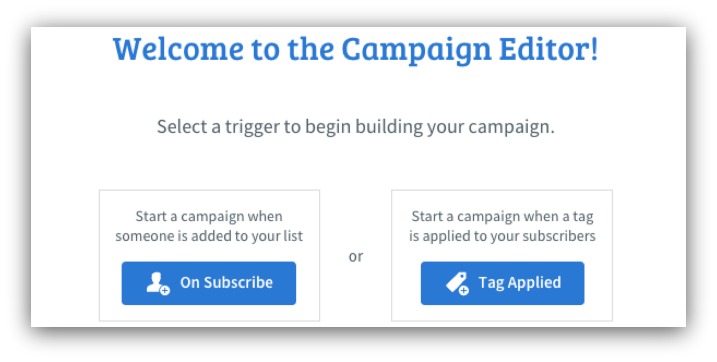
You get two options. You can start a campaign when someone subscribes OR when a tag is applied to your customers.
Don’t worry about the tags. We’re focusing on the subscribe aspect. After you click that button, you’ll go to a drag and drop screen:
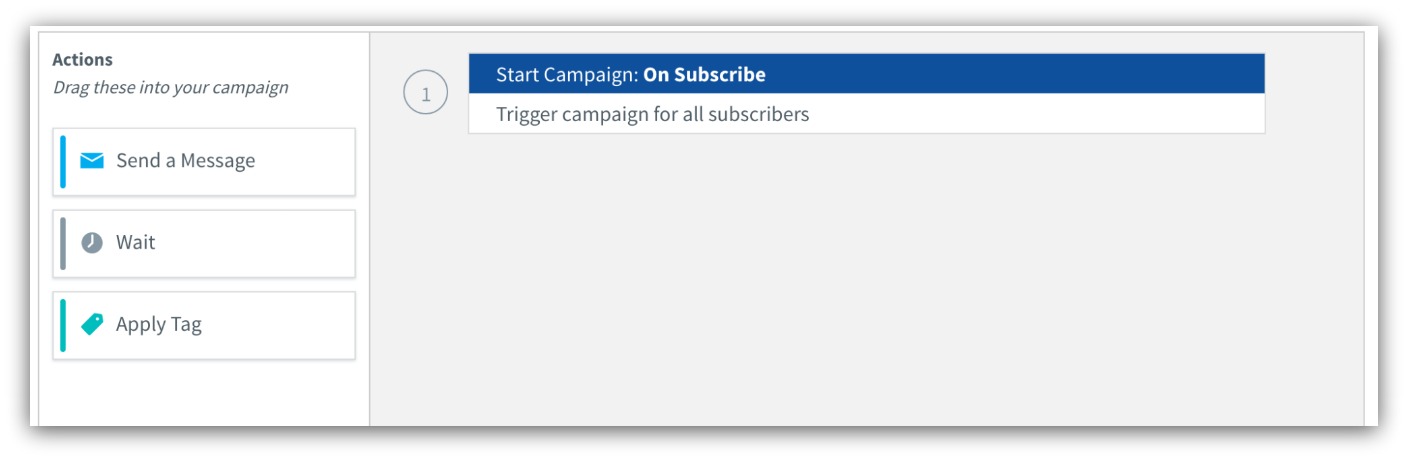
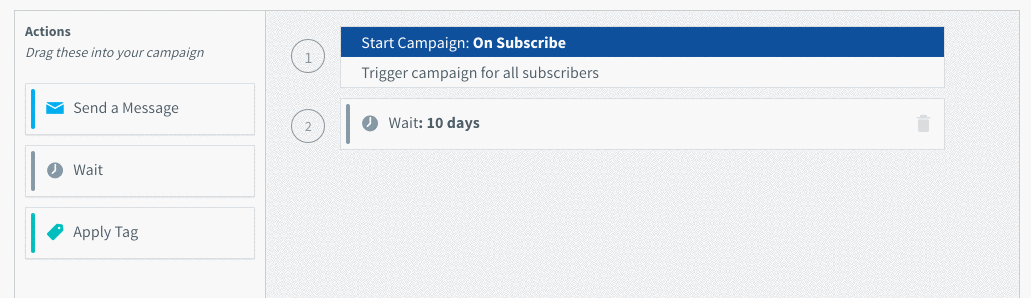
This is where you’ll use the email you saved a while back. You see the first step in this automation sequence is starting a campaign on subscribe. The next step is determining what will happen after a subscribe — in our case, sending a message.
This is where the simplicity really kicks in. All you have to do is drag “Send a Message” from the left bar to the main area:
Then a section pops up on the right side of the page:
You want to choose one of those pre-existing emails you wrote. Clicking that button lets you see every saved email and assign one of them to that “Send a Message” box.
%(20)
And that’s it! You’ve just created your first automated email. Whenever anyone opts into your specific list, they’ll automatically get the email you created.
If you want to dive in a bit deeper and create some badass automation sequences, check out Aweber’s massive library of tutorial videos. The content is excellent and you’ll be able to do anything after watching a few videos.
Grab this free 32 page Ebook on “15 Types Of Emails You Need to Send Right Now”
How To Send An Automated Email From Constant Contact
What’s up, Constant Contacters? A tip of the hat to you especially, because this was my go-to ESP for the longest time.
The thing I love about Constant Contact (that I’m sure you love, too) is how easy it is to point, click and change any element in your email. Not surprisingly, it’s just as easy to send your first automated email.
The only thing that trips most people up is how to get to the automation section. It’s not in the top menu like most ESPs. It’s actually behind the big, colorful “Create” button:
Once you click that button, you’ll see the “Automate Your Email” option:
They give you a bunch of options for automation, like anniversary and birthday emails, series and welcome emails. You’ll use the series option when you want to build a full automation sequence.
For now, we’ll focus on the welcome email option because it’s the easiest way to get familiar with automation. Select that option, choose a template and edit your email like you would any other email:
Once you’ve got your email nailed down, you hit the yellow “Continue” button and choose the list you want the email to go to:
And hey howdy hey, you’re done! Just click save and you’ve got your first automated email set up in Constant Contact. Whenever someone opts into your list, they’ll get the email you wrote.
Plus, if you don’t want to spend a ton of time fussing over your email, you can choose from Constant Contact’s huge library of free email templates.
Grab this free 32 page Ebook on “15 Types Of Emails You Need to Send Right Now”
How To Send An Automated Email From ConvertKit
Ah yes. The ConvertKit’ers. Did you know ConvertKit uses Sumo?
Needless to say, we love them (and not just because they use us). They’re the new kids on the block, but they’re kicking down doors and taking names with their top-notch email services.
The thing to remember with ConvertKit is they’re meant for the best email experience for bloggers. Where they’re stronger than most ESPs is in how easy they make the blogging-to-email handoff for writers.
Their focus is on you sending sequences — basically a long series of follow up emails that point to an end goal.
That’s what you should strive for eventually. For now, I’ll show you how to get to that point with your first automated email.
First, you need to set up a sequence. Which is ironic, because our sequence will just be one email (dictionaries hate me). Click on the “Sequence” button in the menu, name your sequence and build your email in this screen:
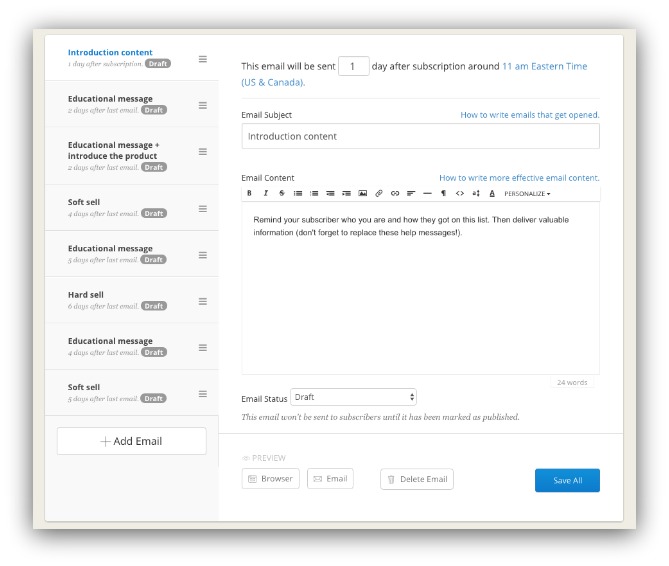
Build out your email message to your liking. You can see what message you’re writing by looking at the left column of the page. Your current email is the one with blue letters.
You won’t have other tabs beneath that email because you’re starting with just one email. Once your email is done, click the “Save” button at the bottom right section of the screen. That’s all it takes to create your first email.
But you have to hook it up to a form. If you left your sequence alone right now, it would sit there and never send. By syncing your sequence up to a form, you’re telling ConvertKit to send your email whenever a certain action happens.
To get that rolling, you need to go into the “Forms” section in the main menu. Go to the form you’ve integrated with your email collection tool. Once you’re in that form, go to the sequence settings and assign the sequence you just created:
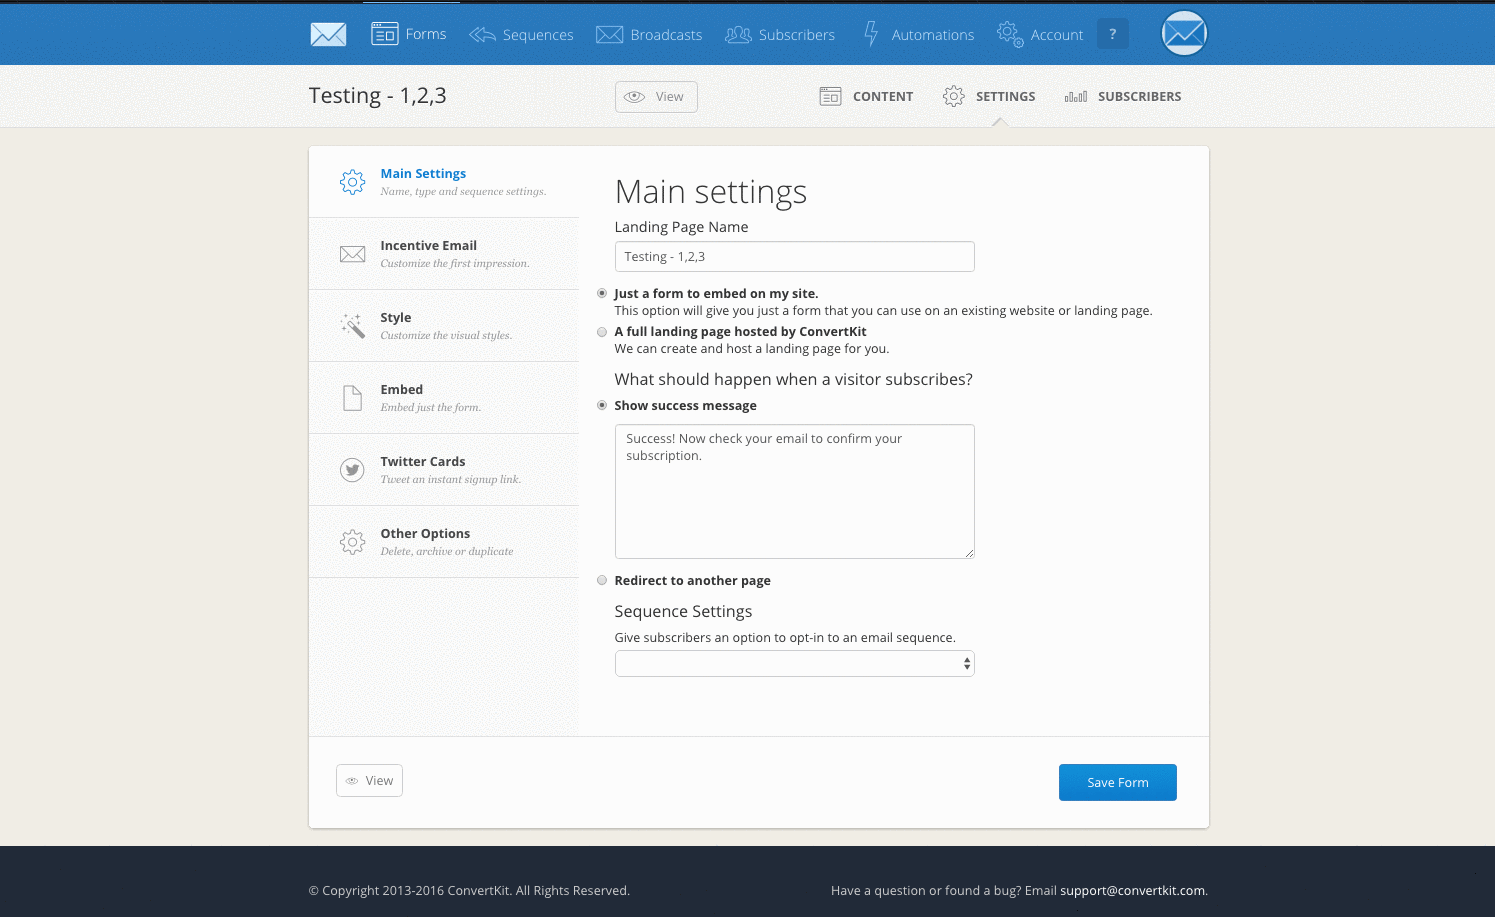
An important thing to note. Make sure the “Make sequence mandatory for all new subscribers” is on. That way the subscriber doesn’t have to check yet another box on their opt-in.
Once that’s done, then YOU’RE done! You’ve got a sequence set up, and everyone who opts-in to your form will automatically get your email.
If you want to dive into the nitty-gritty of sequencing, check out this in-depth article from ConvertKit that explains everything on sequencing.
Grab this free 32 page Ebook on “15 Types Of Emails You Need to Send Right Now”
How To Send An Automated Email From Get Response
Hey. You use Get Response. That’s a good choice, seeing as 350,000 marketers turn to them for email solutions.
You know this, but I love repeating it — what makes Get Response so great is how well they keep adapting to the needs of the market.
They know more and more people need automation in their business. So, naturally, they overhauled their automation section to make it crazy easy (and honestly, fun) to use.
First thing’s first. You have to design an email before you create your campaign. So go into the “Messages” tab in the menu and create the email you want to send.
DON’T send it though. Instead, save it. Then click the “Automation” tab in the main menu bar and select “Create a Workflow”:

Here’s where it gets fun. Get Response knows this is your first time creating automation, so they walk you through it step-by-step. You’ll see a window that asks you to name our automation and choose your starting point.
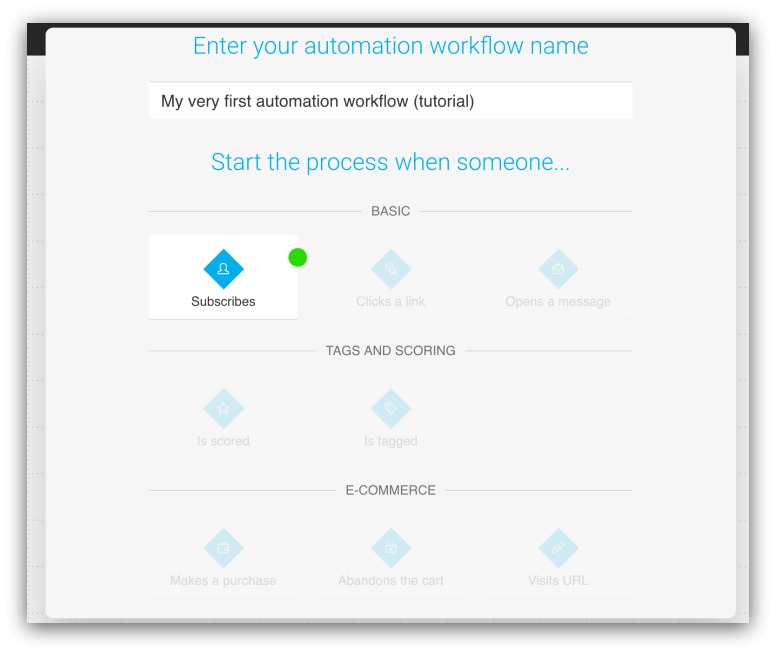
This starting process is your trigger. The action you select from this window is what makes the email send. You want to select the “Subscribes” option, meaning when someone subscribes to your list they’ll get your email.
Selecting that option brings you to this screen:
This is your workboard for your automation sequence. At the top is what you just selected as your trigger — people subscribing via your form. On the far right side, click the “Properties” tab and select the list your email-collecting tool is connected to:
The next step is the effect of that action — sending the email.
On the far right side, go to “Actions” and drag the “Send message” box underneath the subscribe box:
Then you connect the two boxes with that green line. That line is what connects the trigger and the action — meaning subscribers will get your email.
All that’s left is selecting the email you want sent. As your “Send Message” box is highlighted, select the “Properties” tab on the far right and choose the message you want sent:
And there it is! You’ve got your first automated email set up through Get Response.
If you want some next-level knowledge on how to use automation, check out Get Response’s white papers. They’re great guides that dive deep into the automation situation.
Grab this free 32 page Ebook on “15 Types Of Emails You Need to Send Right Now”
How To Send An Automated Email From Hubspot
(Puts on orange shirt, hat, shorts and socks for review)
What’s up, HubSpoters? If you’re reading this, I bet you use some other form of HubSpot — be it blogging, analytics, landing pages or something else.
And now you’re ready to do some email automation! Here’s the deal with HubSpot…
They give you one of the widest ranges of automation available on this list. But, with that wide range of possibilities comes a pretty intimidating barrier of entry.
They use what’s called Workflow to create every automation imaginable. You’ll work primarily through that, but the first you need to create the email you’ll send out.
That functions just like any other email you send. You just go to Content → Email in the main menu and build out our email.
Once you create your email, DON’T HIT SEND. Just hit “Create” and go into the “Recipients” tab to choose “Save for Automation”
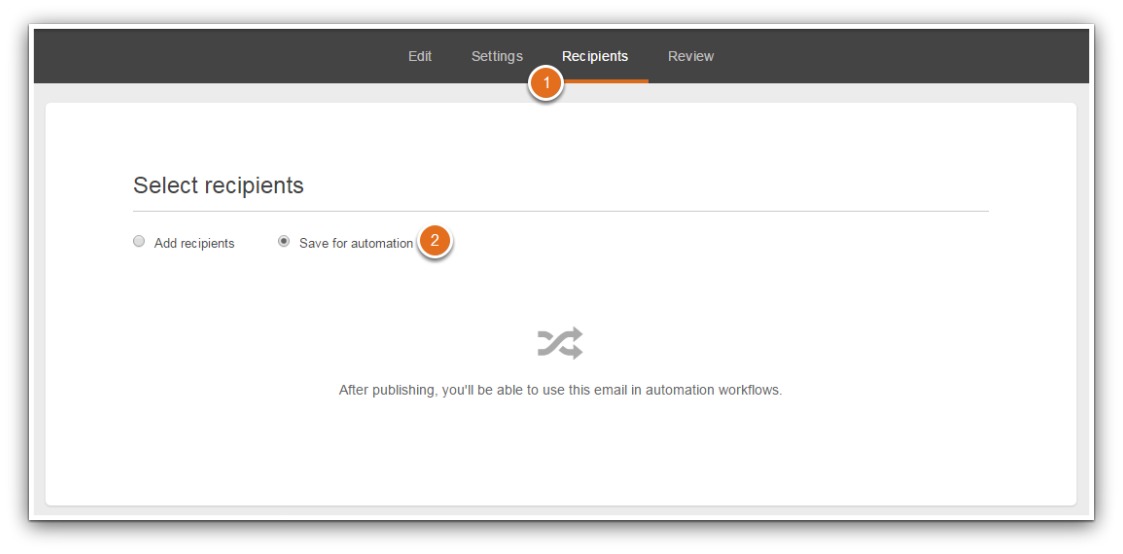
This saves the email for automation purposes. If you didn’t select this, you’d be forced to add recipients the email and send it right then.
After you do that vital step, close out and go to Contacts → Workflows in your main menu bar. This is where we’ll create a new workflow.
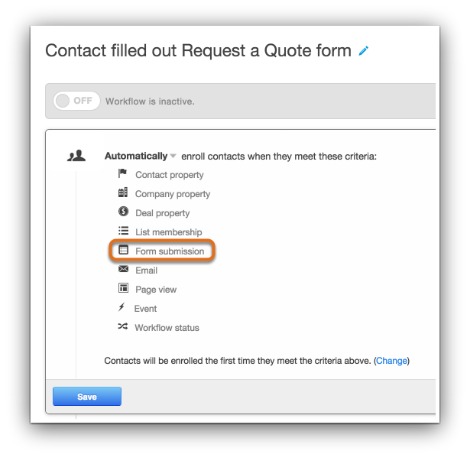
Turn on your workflow and create your first action. The action is what will trigger the email to send. Our action will be “List Membership” where you’ll select the list you connected to your email collection tool:
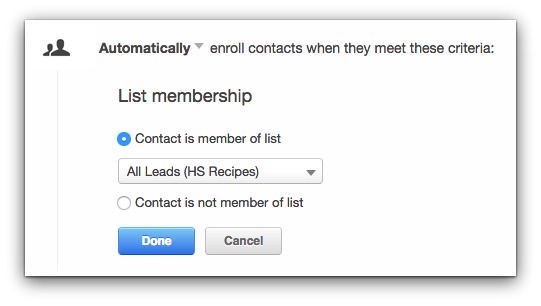
Save your list then click “Add Action” below the rule you just set:
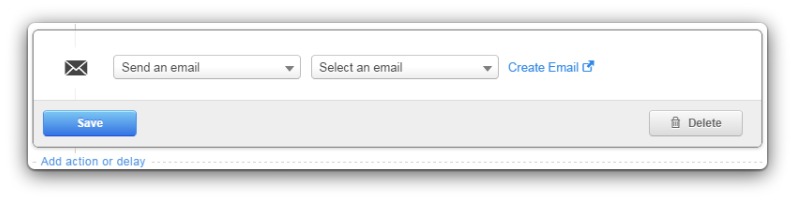
You’ll select “Send an email” and then select the email you just wrote. Save that, then save your whole workflow and…
You’re done! That’s it. You’ve just set up your first automated email. Now anyone that subscribes to your list will get the email you just wrote.
Grab this free 32 page Ebook on “15 Types Of Emails You Need to Send Right Now”
How To Send An Automated Email From MailChimp
Last but most certainly not least, we’ve got MailChimp.
I have to break out some tissues because I’m getting sentimental. MailChimp was the first ESP I ever used. It’s as rock-solid today as the first day I used it, too. There still might not be a better ESP to start out on.
When you send out an automated email in MailChimp, you’ll work in something called a Workflow. That’s their term for an automated campaign (they use Campaign for their regular email sends).
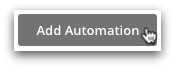
First, go to the menu bar and click “Automation”

On the automation page, click “Add Automation”
Here’s where it gets interesting for our purposes. MailChimp wants to make things incredibly easy for you. So they’ve come up with 35+ pre-made workflows to choose from:
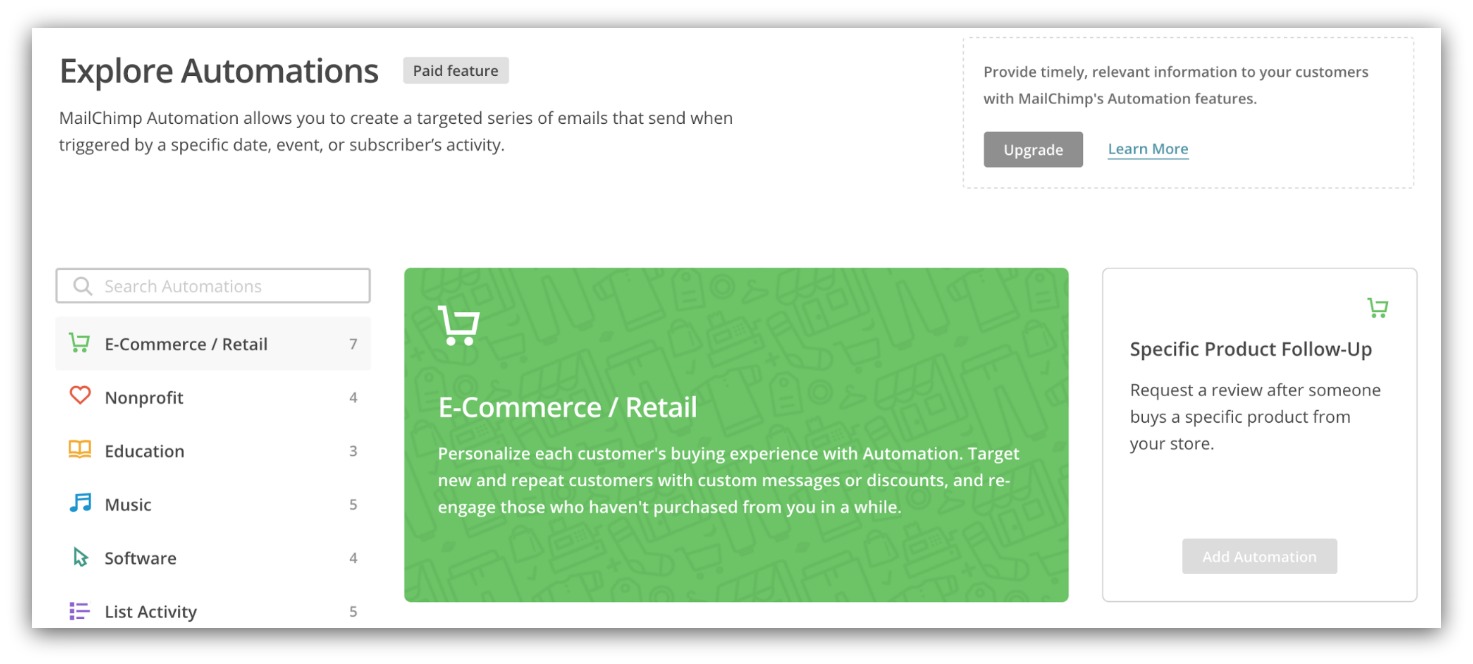
Those are all great and they’ll help you get on your way to full automation quickly. Each pre-made workflow comes with pre-designed emails and triggers. But, in this guide, we’re just looking to send one automated email.
Luckily, MailChimp has an automation for that. Click the “List Activity” option in the left box and select the “Welcome Email” option:
This option sends an email after a visitors opts-in to your list. That’s what we’re looking for — one email
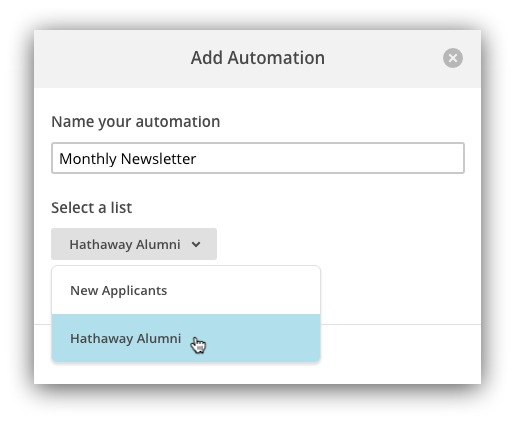
Once you choose that option, a window will pop up asking you to name your automation and choose a list. Select the list you’re using with your email collection tool.
Clicking next brings you to your actual workflow. For this workflow, you’ll see just one email:
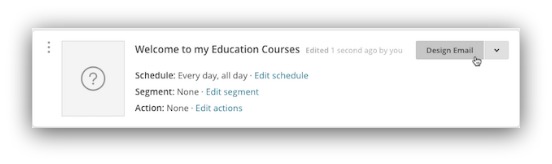
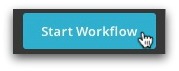
Go in and edit/design that email like you normally would. Once your email is good to go, save it and click “Start Workflow”
And that’s it! You just set up your first automated email in MailChimp. Once you get this down pat, try out the other 35 pre-made automations they have available.
Grab this free 32 page Ebook on “15 Types Of Emails You Need to Send Right Now”


Add A Comment
VIEW THE COMMENTS